


Again the layouts are straight-forward and crisp, and the finished cards are very satisfying.


I'll be back soon with some of my very own designs!
Cheers
Carol


 These layouts are so easy yet give you a polished finished look! And I love water colouring so this was downright fun.

 This first card uses the Stamp set "Pocket Silhouettes" and Bella Rose Designer Paper.
 And here is old faithful "Heartfelt Thanks" stamp set, along with Tempting Turquoise brads.


The stamp set is Lovely as a Tree, and the heart is from A Happy Heart Day (I masked the little mouse face to make the heart shape complete.) The ribbon is Very Vanilla, along with the base of the card and stamping backgrounds.
I have some colour challenges to complete and you'll see them early next week.
Cheers, Carol
 I used Real Red, Whisper White, and Basic Black cardstock, and embossed both the train and the sentiment in black. I masked the 'Happiness' in the sentiment and replaced it with 'Love' from the 'All Holidays' stamp set. (The Peace Love Joy stamp) The little heart is from the 'Sweet Celebrations' stamp set. Plus there are four black brads.
 I'm enjoying this as much as making the Christmas cards! I'll post more soon.
+004.jpg) It's a set of six cards (two each of three designs) and a box to hold them, inspired by Andrea Walford's Demo to Demo site. It would be a welcome gift or a great set to have to send your own cards.
It's a set of six cards (two each of three designs) and a box to hold them, inspired by Andrea Walford's Demo to Demo site. It would be a welcome gift or a great set to have to send your own cards.+007.jpg) I used Real Red, Very Vanilla, and Kraft cardstock.
I used Real Red, Very Vanilla, and Kraft cardstock.+006.jpg) And lots of round punches! Plus a little bit of the Vanilla hardware.
And lots of round punches! Plus a little bit of the Vanilla hardware.+005.jpg) These buttons are actually Riding Hood Red, but I like how they look on this card.
These buttons are actually Riding Hood Red, but I like how they look on this card.+002.jpg)

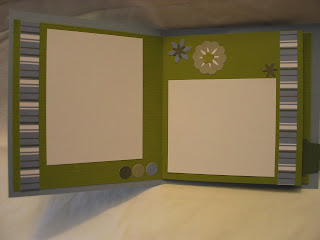
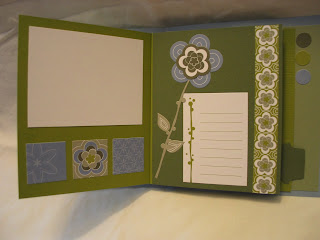


The pages get progressively smaller to allow the pages to flip easily.
Directions for Waterfall Scrapbook:
Supply List:
Cover Page Dimensions – 11 x 6 scored at 5 1/4 and 5 3/4 Slider Page Dimensions – 11 x 5 ½ scored at 5 ½, 6, 6 ½, 7, 7 ½, and 8
Page One – 5 ½ x 5 ½ Page Two - 5 x 5 ½ Page Three – 4 ½ x 5 ½
Page Four – 4 x 5 ½
Page Five – 3 ½ x 5 ½
Page Six – 3 x 5 ½
You can choose all the same colours for the pages, or vary the colours. I used Old Olive, Bordering Blue, and Always Artichoke.
Punches, ribbons, brads, rub-ons - whatever you wish to use to decorate your scrapbook.
1.Crease the slider page really well along all score lines. Crease them so when the page is left open on its own it wants to curl up. Fold in half and prepare for assembly.
2. Apply sticky strip to each of the slots where a page will be placed (ie. Between each of the score lines)
3. Adhere the pages from the smallest (the page on the furthest right side) matching the left edge with the score line and the bottom with the bottom of the slider page.
4. Keep attaching pages in order from right to left.
5. Attach the left page of the slider sheet to the inside front cover
6. Using the Round Tag Punch, create a tab in a coordinating colour of cardstock or DSP and using sticky strip attach it to the outside edge of the last (smallest) page of your scrapbook.
7. Scrapbook the pages according to your taste and desire.
8. The inside back cover can be used for a photo or you could attach a pocket to hold momentos.
9. When your scrapbook is closed and facing you, 'push' the tab to open the pages, and 'pull' the tab to close them.
If you have any questions, please contact me! I'd love to see your creations using this idea. carolmatthews@ns.sympatico.ca


 These are two Gift cards I this morning so that I could get one of our Christmas boxes in the mail. I'm late, but not too late I hope!
 This one was made with the Holiday Treasures Designer Paper, and although you can't see it in the photo a few of the flowers have been cut out and attached with dimensionals. I used the scallop punch on the top flap, and tied it with a Regal Rose ribbon.
 This blue one is made from the Ski Slope DSP which I love! I just added a bar of Whisper White and Baja Breeze with three silver brads to give it a more manly look. Below you can see the inside pattern for both of the gift cards.
 Hi Folks! I had a workshop last week where the ladies wanted to make a Flip book, so I thought I would share mine with you. I used the Illuminations stamp set for the cover. The cardstock colours are Whisper White, Old Olive, and Rose Red. Instead of ribbon I used velcro closures.
Inside I used the Top Note die in white for either a photo background or a place to write. The flowers are stamped from the Embrace Life set. And the scrolls are from Baroque Motifs.
 I also used some of our felt flowers and the scallop punch to decorate the pages.
 And here is a photo of the other five Flip Books that were made.
 These were all done using the Christmas Treasures DSP.
 December 3rd is my sister-in-law's birthday and this is the card I made for her. This is the first time using the 'Crazy For Cupcakes' stamp set and I love it. The colours used are Regal Rose, Old Olive, and Whisper White cardstock, the DSP is Georgia Peach. The marker colours are Regal Rose, Pretty in Pink, and Old Olive, ribbon is Regal Rose. I embossed the white cardstock with the Birthday folder in my Cuttlebug.
 I love the puffy stuff that I used for icing. You squeeze it on out of the bottle and it looks like paint. Then you heat it with your heat gun and it puffs up beautifully! Looks almost good enough to eat! Hope you like it Pam! Happy Birthday!


I didn't have exactly the same supplies as Sharon so mine is slightly different. But that's the joy of it - there are so many ways to make it 'your own'. Different stamps, different punches, different colours. I hope to make several more for friends.
Sharon has all the directions on her blog. Please tell her I sent you!
http://notimetostamp.blogs.splitcoaststampers.com/2008/11/26/box-for-accordion-project/
http://justritestampers.blogspot.com/2008/11/day-five-with-sharon-johnson-justrite.html
I plan to make one for Valentine's and Easter and Spring and Birthdays... Another great idea Sharon! Thanks for sharing!
