Sarah W, from Annaplis, Maryland. Thanks Sarah, and everyone else for visiting my blog. Hope you'll come back soon.
I'll be sending Sarah a sample of ribbon candy, chicken bones, and animal candy, along with a little SU candy as well.
Merry Christmas to everyone and I hope Santa is good to you!!
Wishing you peace and joy ~
Carol

24 Dec 2008
18 Dec 2008
Tree Candy Ornament


This is an easy little decoration, or take home gift, or hospital/nursing home gift. And you can make it whatever size you want by enlarging or minizing your pattern (just don't go over 12 inches wide). It was introduced to me first by Yvonne Balmer.
I taped mine together with sticky strip to make sure it would be strong enough to hold the candies. But if you were just doing it for decoration, or putting something lightweight inside, you could use Snail adhesive.
Make sure your folds are crisp, and that you cut the holes for the ribbon or string before you clue it all together. Then decorate as you wish. It holds from 8 to 12 candies depending on the size of candy.
Have fun!
Design Team
Just had to share (read brag!). I've been chosen to be on my first design team: The Latenightstampersconvention Design Team (now that's a mouthful!) This is a group of 451 Stampin' Up demonstrators in the US and Canada who love going to SU Convention and Leadership events, and enjoy sharing ideas as well as samples of artwork.
It's a three month assignment, and I will be creating projects for different themes as well as creating challenges for members. And I'll be posting here on my blog as well!
So to celebrate, I want to give away some blog candy. (and this is literally blog CANDY!) I live in a town (Truro, NS) that has its own candy factory and makes such things as Chicken Bones, Ribbon Candy, and Barleycorn Candy. Plus there will be some Stampin' Up! candy as well.
Just leave a message telling me your favourite kind of candy and the winner will be announced on ...... gosh - next Thursday is Christmas!!! How about I draw it on Wednesday, Christmas Eve! I'll contact the winner by email and obtain your address so I can mail it out. Can't wait to hear about all those candies, yum.
11 Dec 2008
Card Pockets for Gifts of Money
 These are two Gift cards I this morning so that I could get one of our Christmas boxes in the mail. I'm late, but not too late I hope!
 This one was made with the Holiday Treasures Designer Paper, and although you can't see it in the photo a few of the flowers have been cut out and attached with dimensionals. I used the scallop punch on the top flap, and tied it with a Regal Rose ribbon.
 This blue one is made from the Ski Slope DSP which I love! I just added a bar of Whisper White and Baja Breeze with three silver brads to give it a more manly look. Below you can see the inside pattern for both of the gift cards.
This one closes with velcro, the other is tied with a ribbon.
These were very simple and quick to make. I used 8 1/2 x 12 cardstock, scored on the long side at 4 inches and 8 inches. Then I cut 3/4 inch off the third panel, plus a cut-a-way to make the cash/money order/cheque easier to remove (see photo above). I used two sided tape to attach the two panels together.
Hope you like them!
Carol
4 Dec 2008
Flip Book
 Hi Folks! I had a workshop last week where the ladies wanted to make a Flip book, so I thought I would share mine with you. I used the Illuminations stamp set for the cover. The cardstock colours are Whisper White, Old Olive, and Rose Red. Instead of ribbon I used velcro closures.
Inside I used the Top Note die in white for either a photo background or a place to write. The flowers are stamped from the Embrace Life set. And the scrolls are from Baroque Motifs.
 I also used some of our felt flowers and the scallop punch to decorate the pages.
 And here is a photo of the other five Flip Books that were made.
 These were all done using the Christmas Treasures DSP.
Thanks for stopping by, and thanks for all the wonderful comments on past posts!
2 Dec 2008
Happy Birthday Cupcakes
 December 3rd is my sister-in-law's birthday and this is the card I made for her. This is the first time using the 'Crazy For Cupcakes' stamp set and I love it. The colours used are Regal Rose, Old Olive, and Whisper White cardstock, the DSP is Georgia Peach. The marker colours are Regal Rose, Pretty in Pink, and Old Olive, ribbon is Regal Rose. I embossed the white cardstock with the Birthday folder in my Cuttlebug.
 I love the puffy stuff that I used for icing. You squeeze it on out of the bottle and it looks like paint. Then you heat it with your heat gun and it puffs up beautifully! Looks almost good enough to eat! Hope you like it Pam! Happy Birthday!
30 Nov 2008
Accordian Tag Merry Christmas


This is my rendition of the amazing paper crafter Sharon Johnson's Accordian Tag Christmas. This lady is so talented and I have learned so much from her. This adorable greeting is all one piece, approximately 4 1/2 inches tall, and 48 inches long. Perfect for a mantle, window sill, buffet, or picture ledge. And not only did she create this, she also designed a box to hold it folded together and ready to give as a wonderful gift!

I didn't have exactly the same supplies as Sharon so mine is slightly different. But that's the joy of it - there are so many ways to make it 'your own'. Different stamps, different punches, different colours. I hope to make several more for friends.
Sharon has all the directions on her blog. Please tell her I sent you!
http://notimetostamp.blogs.splitcoaststampers.com/2008/11/26/box-for-accordion-project/
http://justritestampers.blogspot.com/2008/11/day-five-with-sharon-johnson-justrite.html
I plan to make one for Valentine's and Easter and Spring and Birthdays... Another great idea Sharon! Thanks for sharing!
25 Nov 2008
HOLIDAY EXTRAVAGANZA!

Yes, it's true... Stampin' Up! is having a BIG SALE starting Wednesday, November 26 only until December 1st. It's so special that even we Demos don't know what's included except that there are bundles of products up to 50% off. Just check my Stampin' Up! site : (http://www.attherookery.stampinup.net/), tomorrow (Wednesday) around 3 pm Atlantic time, to see what's available. Here's hoping it's something you really like!

And if you need someone to play Santa Claus, just send me an email carolmatthews@ns.sympatico.ca listing what you want and the contact information (name, email, phone) of the people who need to know. I'll make sure they find out exactly what you would like to see under your tree this year.
Happy Stamping!
Carol
17 Nov 2008
Today's Favourite Christmas stamp set

This card is totally CASEd. (Copy And Share Everything, or something to that effect). I thought it was so beautiful that I didn't change a thing, unfortunately the photo doesn't do it justice.
I want to thank Lisa Hensley for creating it, as simply looking at it brings me delight. I hope you enjoy it too.
Here are the details:
Stamp Sets: Winter Post, En Francais, Frames with a Flourish
Paper: Chocolate Chip, Riding Hood Red, Very Vanilla
Ink: Chocolate Chip, Close to Cocoa, Old Olive, RHR, Brocade Blue, Sahara Sand
Accessories: Brads, dimensionals, Pretties Kit, Alpine ribbon originals, chocolate twill ribbon, Accents & Elements
Paper: Chocolate Chip, Riding Hood Red, Very Vanilla
Ink: Chocolate Chip, Close to Cocoa, Old Olive, RHR, Brocade Blue, Sahara Sand
Accessories: Brads, dimensionals, Pretties Kit, Alpine ribbon originals, chocolate twill ribbon, Accents & Elements
15 Nov 2008
A Cardinal Christmas Card Class
 These cards are copied directly from page 19 of the Holiday Mini Catalogue using the "A Cardinal Christmas" stamp set. I love Cardinals so this set was immediately on my list of 'must haves'. You can colour the image with markers (that what I used on this card), or watercolour it with the Wonder Crayons. If you do watercolour I suggest you use watercolour paper as it makes your job easier and looks much better in the end.
The Holly card is 3x3 and I 'stamped off' (stamp first on scrap paper and then on your card) the holly directly on the Very Vanilla cardstock and then I stamped it on cardstock and cut it out and attached it with dimensionals over the original.
Now I'm back to my stamp room to create more Christmas cards, so be prepared to see a variety because I love Christmas (have I mentioned that already?).
Cheers
Carol
 A Cardinal Christmas # 111760 Set of 4 Die Cut stamps $28.95
14 Nov 2008
Country Living Holiday Collection Stampin' Kit

Invite the warmth and coziness of the holidays into your home with Stampin' Up!'s Country Living Holiday Collection Stampin' Kit. This kit has everything you need to create beautiful handcrafted ornaments, so you can relax and enjoy the process.
See all that's included for $58.95
These are the Designer Series Papers, chipboard die cuts, and stamps included in the Country Living Holiday Collection Stampin' Kit. In fact there's even more...

The kit comes with:
Holiday Collection stamp set (six stamps)
Four 12" x 12" sheets of die-cut chipboard
Eight 12" x 12" sheets of die-cut Designer Series paper (2 ea. of 4 double-sided designs)
Four 12" x 12" sheets of Designer Series paper (2 ea. of 2 double-sided designs)
Two 12" x 12" sheets of Whisper White card stock
25 yds. Silver Metallic cord
10 yds. 3/8" Whisper White taffeta ribbon
Pretties Kit brads (20)
Stampin' Dimensionals
Dazzling Diamonds Stampin' Glitter (1/2 oz.)
Tombow Multi Purpose Adhesive
Riding Hood Red Classic Stampin' Spot
Old Olive Craft Stampin' Spot
Uninked Stampin' Spot
Whisper White Craft Ink refill
 Everything you will need to create dozens of decorations. Great for a family gathering, youth group, or seniors' organization.
 Contact me (carolmatthews@ns.sympatico.ca) OR shop directly through my Stampin' Up website (http://www.attherookery.stampinup.net/) to order your kit today and start planning your Christmas craft night!

The kit comes with:
Holiday Collection stamp set (six stamps)
Four 12" x 12" sheets of die-cut chipboard
Eight 12" x 12" sheets of die-cut Designer Series paper (2 ea. of 4 double-sided designs)
Four 12" x 12" sheets of Designer Series paper (2 ea. of 2 double-sided designs)
Two 12" x 12" sheets of Whisper White card stock
25 yds. Silver Metallic cord
10 yds. 3/8" Whisper White taffeta ribbon
Pretties Kit brads (20)
Stampin' Dimensionals
Dazzling Diamonds Stampin' Glitter (1/2 oz.)
Tombow Multi Purpose Adhesive
Riding Hood Red Classic Stampin' Spot
Old Olive Craft Stampin' Spot
Uninked Stampin' Spot
Whisper White Craft Ink refill
 Everything you will need to create dozens of decorations. Great for a family gathering, youth group, or seniors' organization.Contact me (carolmatthews@ns.sympatico.ca) OR shop directly through my Stampin' Up website (http://www.attherookery.stampinup.net/) to order your kit today and start planning your Christmas craft night!
 Offer valid until December 31, 2008 or while supplies last.

11 Nov 2008
Samples from a Tag Swap
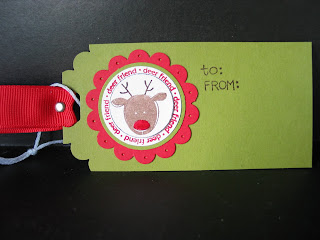
A while back I participated in a Christmas Tag Swap. I made 50 tags (Yes, I can't believe it myself!) in five different designs and sent them off. It was more time consuming than I had anticipated, but a few weeks later when 50 new and inspiring tags arrived in my mailbox I was glad I'd done it!. I want to share them with you so you can enjoy and be inspired as well. Here we go:


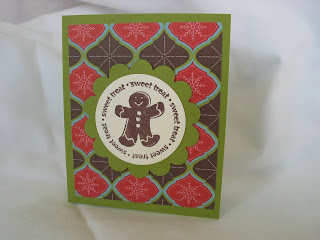 Now these cards are all different sizes even though they look somewhat the same in the photos. Just consider the size of the stamp or punch used and it gives you a better idea of the size.


Some of these I will use as samples for workshops, some I will use on my Christmas gifts, and some I will use on the front of cards. So many possibilities!!


Isn't the little envelope just the cutest thing!


Isn't this just gorgeous!


That's all for now! Thanks for visiting!
Subscribe to:
Posts (Atom)