31 Jan 2009

Did I mention I'm on a 'Card Set' binge?

Here's another Andrea Walford inspired set. The cardstock colours are Pink Pirouette, Riding Hood Red, Chocolate Chip, and Kiwi Kiss. The DSP is Bella Rose, the stamp set is Dreams du Jour.


Again the layouts are straight-forward and crisp, and the finished cards are very satisfying.


I'll be back soon with some of my very own designs!
Cheers
Carol


And still more card sets

I don't know what it is with me this month, but everything seems to be coming in sets! This is a set of 8 cards that I've made for my daughter (two of each design). She requested 'birthday cards' please and I was just looking for an excuse to use this DSP (unfortunately it has been retired, however there are ones just as beautiful in the new catalogue)


The cardstock is Pink Pirouette, Bashful Blue, and Chocolate Chip (same as in the DSP with the addition of Certainly Celery). The layout of the cards is taken from one of Andrea Walford's Demo to Demo class kits. (Thanks Andrea!) The stamp set used is Bloomin' Beautiful.

Here are close-ups of each card:


These layouts are so easy yet give you a polished finished look! And I love water colouring so this was downright fun.


Hope this gave you some ideas for cards of your own.
Cheers
Carol


20 Jan 2009

More Challenge Cards

Wow - I haven't meant to be away so long! Life does get busy...

These two cards are from the Latenightstampersconvention2008 colour challenge. The colours we had to use were Tempting Turquoise, Riding Hood Red, Pretty in Pink, and Tangerine Tango. Not a collection of colours that immediately come to mind... but they pack a powerful image.


This first card uses the Stamp set "Pocket Silhouettes" and Bella Rose Designer Paper.

And here is old faithful "Heartfelt Thanks" stamp set, along with Tempting Turquoise brads.
I'll have more to post this weekend after I receive my latest order!!
Cheers
Carol

12 Jan 2009

Another (Easy) Card set

Oh I love these snowy Sundays when all I need to do is spend time in my stamping studio. Here's what I came up with:


It's a set of ten cards using the colours Baja Breeze, Creamy Caramel, Chocolate Chip, and Whisper White. I started by choosing the 'Autumn Vine' Designer Series Paper from Stampin' Up! (unfortunately it's retiring on January 18th) and added some coordinating cardstock, plus a sheet of DSP from the Baja Breeze collection.

The holder uses only one sheet of 8 1/2" x 11" Baja Breeze cardstock, scored on the 11" side at 5" and 6". On the 8 1/2" side score it at 2" and 1 1/2". Fold on all score lines. In the centre of your paper (between the scored 5" and 6") cut from the bottom to the 2 1/2" score. Fold this small piece up and glue.


You will see on the back of the folder/holder I've cut two slits with my craft knife to allow the ribbon to pass through. Also punch a hole on the front cover (see above) 3 inches from the top and 1/4" in from the side (a 1/4" punch works for 1/4 " grosgrain, use another punch to match larger ribbon) Do the same on the back cover.

Now thread your ribbon from the outside of the back cover into the first centre slot, thread it to the outside and then back in the slot beside and out through the punch on the cover. This will help to hold your cards in place and allow you to tie the folder closed.

This holds ten cards and envelopes and I chose to make six Thank You cards and four Sympathy. (two of each style)

On this card I used the 'Eastern Influences' bird stamp and the sentiment from the 'Fresh Cuts' set. Brads are from the Soft Subtles - Apricot Appeal (not quite More Mustard to match the DSP but it works!)


'Pocket Silhouettes' is the stamp set I used for this card:


The sentiment on this one is from 'Elegant Cheer':


The sentiment on these Sympathy cards is from 'Close as a Memory'.


As you can see - the cards and folder are very simple to make and the whole thing was done in an afternoon. Hope you like it!
Cheers
Carol

10 Jan 2009

Challenges make me produce!

I'm really enjoying working on a Design team because it makes me produce! Which I love to do but I used to put off my 'play time' until everything else was done. Now my 'play' is 'work' and I love to get at it!
This card is a fun non-traditional Valentine. Tart & Tangy is such a fun stamp set and I thought I'd see what I could come up with.
I used Only Orange Classic Ink pad to stamp the oranges, and the 1" circle punch to punch out the solid oranges. The heart is from the Sweet Celebrations set, and the sentiment is from the One Smart Cookie set. The background of the sentiment is punched with the Designer Label punch. Cardstock is Whisper White and Only Orange.
The second card is for the Masculine Valentine challenge. I haven't used Serene Sage in a while and I really like it so here it is to punch up the Chocolate Chip cardstock.

The stamp set is Lovely as a Tree, and the heart is from A Happy Heart Day (I masked the little mouse face to make the heart shape complete.) The ribbon is Very Vanilla, along with the base of the card and stamping backgrounds.

I have some colour challenges to complete and you'll see them early next week.

Cheers, Carol

5 Jan 2009

Masculine Valentine Card

When my husband saw the 'Happiness is a Journey' train he insisted that I get the set. So since he likes it so much I've made his Valentine card with it. (Shhh! Don't tell)
I used Real Red, Whisper White, and Basic Black cardstock, and embossed both the train and the sentiment in black. I masked the 'Happiness' in the sentiment and replaced it with 'Love' from the 'All Holidays' stamp set. (The Peace Love Joy stamp) The little heart is from the 'Sweet Celebrations' stamp set. Plus there are four black brads.
Inside I used the Font CD to write the sentiment.
I'm enjoying this as much as making the Christmas cards! I'll post more soon.
Cheers
Carol

3 Jan 2009

Valentine Cards and Box Set

I've been busy this week working on the Design Team projects, and here's what I came up with:

It's a set of six cards (two each of three designs) and a box to hold them, inspired by Andrea Walford's Demo to Demo site. It would be a welcome gift or a great set to have to send your own cards.
I used Real Red, Very Vanilla, and Kraft cardstock.

And lots of round punches! Plus a little bit of the Vanilla hardware.


These buttons are actually Riding Hood Red, but I like how they look on this card.
Here's a close up of the box. I used Real Red Ribbon, dyed some of the Pretties Kit white flowers Real Red and placed half pearls in the centre. The 'leaves' are Old Olive flowers from Flower Fusion. The Kraft Designer Paper is from the Level 1 Hostess Gift assortment.


Hope you like it!


1 Jan 2009

Waterfall Scrapbook

This is a nice project to give as a gift, or for yourself, and it's easier to do than it looks! I got the idea from UStamp (http://www.ustamp.blogspot.com/) but I've changed the size a bit, as well as a few other things. If you are familiar with waterfall cards, you'll recognize the mechanism. Hope you like it!

I used paper and stickers from the Simply Scrappin' Winter Retreat kit, this made it really easy and fast! You could get at least two scrapbooks from the kit (with the addition of a bit of 8 1/2 x 11 coordinating cardstock) They would not be exactly the same, but there are enough embellishments to decorate two scrapbooks with bits left over for other projects.


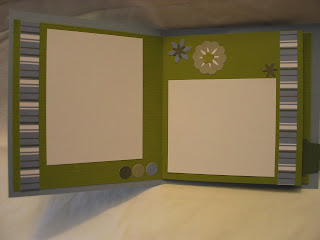
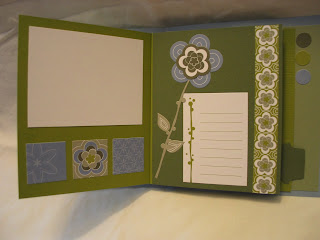
The pages get progressively smaller to allow the pages to flip easily.

Directions for Waterfall Scrapbook:

Supply List:
Cover Page Dimensions – 11 x 6 scored at 5 1/4 and 5 3/4 Slider Page Dimensions – 11 x 5 ½ scored at 5 ½, 6, 6 ½, 7, 7 ½, and 8
Page One – 5 ½ x 5 ½ Page Two - 5 x 5 ½ Page Three – 4 ½ x 5 ½
Page Four – 4 x 5 ½
Page Five – 3 ½ x 5 ½
Page Six – 3 x 5 ½

You can choose all the same colours for the pages, or vary the colours. I used Old Olive, Bordering Blue, and Always Artichoke.

Punches, ribbons, brads, rub-ons - whatever you wish to use to decorate your scrapbook.

1.Crease the slider page really well along all score lines. Crease them so when the page is left open on its own it wants to curl up. Fold in half and prepare for assembly.

2. Apply sticky strip to each of the slots where a page will be placed (ie. Between each of the score lines)

3. Adhere the pages from the smallest (the page on the furthest right side) matching the left edge with the score line and the bottom with the bottom of the slider page.

4. Keep attaching pages in order from right to left.

5. Attach the left page of the slider sheet to the inside front cover

6. Using the Round Tag Punch, create a tab in a coordinating colour of cardstock or DSP and using sticky strip attach it to the outside edge of the last (smallest) page of your scrapbook.

7. Scrapbook the pages according to your taste and desire.

8. The inside back cover can be used for a photo or you could attach a pocket to hold momentos.

9. When your scrapbook is closed and facing you, 'push' the tab to open the pages, and 'pull' the tab to close them.

If you have any questions, please contact me! I'd love to see your creations using this idea. carolmatthews@ns.sympatico.ca