11 Dec 2009

ESPECIALLY FOR BIG SHOT OWNERS!


Wow - lots of treats for Big Shot owners, plus new colours of Decor Elements Vinyl! Visit my on-line Stampin' Up! store site to order. Simply click on 'order now' then click on the '12 days of holiday sales' in the left column. Or you can contact me to place your order. Have fun!

Things to Remember:


The sale begins Friday, December 11, 2009, 12:01 AM (MT), and ends Tuesday, December 22, 2009, 11:50 PM (MT).

Discounts range between 15-25 percent.

All items on sale can be purchased for all 12 days.

There are no quantity limits.

There are no qualifiers to receive the discount.

For online orders, discounts will be reflected in the "regular price"; "catalogue price" will show the non-discounted price.

9 Dec 2009

Isn't it Pretty!

I've just had a new Blog banner designed by Laycock Designs, and I love it. Michelle is a fantastic designer and offers a multitude of services. You can visit her at http://www.laycockdesigns.com/. Tell her I sent you!

LAST MINUTE GIFTS

There are only 17 days left until Christmas! Can you believe it!
Do you still have loved ones to buy gifts for? Me too. Stampin' Up! has some last minute gift ideas, and if you contact me by December 10th (Thursday) they will arrive in time!


My Digital Studio is a great gift for all ages! They will love making scrapbook pages, cards, and calendars for themselves and friends using the simple software. Plus when you order this exciting software suite, you'll receive a free Décor Elements piece valued up to $22.95!

Simply Sent card kits are a great ready-to-wrap gift and have everything you need to complete 10 cards. This is the perfect last-minute gift for card makers or people you think may like making cards!

Anyone who has a Big Shot will want the Alphabet Simple Letters Bigz die. It can cut through a variety of materials including vinyl, chipboard, and felt. This makes a great gift for a seamstress who would like to sew custom appliquéd pieces on her projects, someone who wants to create her own vinyl phrases to personalize their home décor, or any paper crafter who uses letters. And when you purchase this item, you qualify for a free Décor Elements piece valued up to $22.95!

Add the final touch to your gift that says "I was thinking of you when I bought this gift" by personalizing it with Décor Elements. Add an Upsy Daisy Décor Elements to a laptop or cut it apart and apply it to a cell phone. Put all of the toys from Santa together in one container and add the So Many Toys Décor Elements to it, or use individual letters to add monograms and names to your gifts. These extra special touches won't go unnoticed.

Something different, something special, something to solve your shopping problems. You can order directly on-line or contact me through email or phone.

BUT - if you're looking for something for yourself, mark Friday, December 11 on your calendar as Stampin' Up! is releasing the 12 Days of Holiday Sales with many never-before-discounted items!

24 Nov 2009

Beautiful Boxes

I'm always amazed at how easy boxes are to make - and how beautiful they can be. The first boxes are perfectly sized to hold ten 5 1/2 " x 4 1/4" cards, or a scarf, or other small gifts.


Both boxes have Holiday Lounge Designer Series Paper attached to the lids, and the snowflake on the blue box is Snowflake Die #2 and was cut out using the Big Shot.

The next box was designed to hold a small cake, cookies, or tarts. The plastic window allows the treats to be seen, and I love this wide striped ribbon. If I had known how lovely it was I would have been using it much sooner!


Unfortunately it was empty when it was photographed, but it will soon be filled with carrot cake to give to a neighbour!


That's all for today - I'll be back soon with more goodies!

22 Nov 2009

Pretty Packaging

Last week I held classes on packaging for Christmas. We made 5 different projects and this is the first one - made from an empty Pringles potato chip can. It's a smaller size than normal (they were on sale for $1 per can), and will hold a dozen cookies, or peanut brittle, or chocolate bark, or non-food items as well.


I scored Real Red card stock at 1/2 inch intervals to give it more visual interest and attached it to the bottom sectioin of the can with sticky tape.  Then I used the Cocoa DSP for the top section - love those stripes! The ribbon is the Soft Suede polka dot.


The bow on the front is tied with the Soft Suede and 1/4 inch grosgrain ribbon in Real Red and attached to the can with Mini Glue Dots. The ovals are cut using the Big Shot Ovals die, and the snowflakes are punched using our new snowflake punch. There is a red circle on top with two snowflakes attached.


I really like it and plan to make several to fill with extra little Christmas treats this year. I'll show you another idea for packaging tomorrow!

21 Nov 2009

BACK AT LAST!

It has been a Very Busy Month - which is good, except that I haven't been posting regularly. I met a lot of new stampers, had a lot of fun, made a lot of projects, and now I want to show you some of what I've been up to!


November 14 and 15 I participated in the Festive Craft Market at the Nova Scotia Agricultural College - it's one of the major fundraisers for their sports organizations. So I spent many hours preparing for that. Along with selling crafts I also wanted to make contacts with new people and it was a wonderful weekend for that. I met dozens of people who either already scrapbook and create with paper, or people who would like to start, so I'm planning classes for the new year!

I didn't have a huge amount of crafts to sell and while the display looks a little sparse, it took a long time to prepare it all. In the end I had a successful weekend so I was pleased. This is my regular display:


And here is my Christmas display:


I must admit I was exhausted after it was over, and I'm glad to be back on a more regular schedule. The most popular items were the Gift Card holders! Wonder what it will be next time...

1 Nov 2009

TWELVE DAYS OF CHRISTMAS!


Hey Stampers!

This is my holiday gift to you! Each day for twelve days I will be giving you new ideas to use for your holiday celebrations! My gifts will include card ideas, gift ideas, and wrapping and tag ideas-- a new one each day!

If you already subscribe to my newsletter you will receive the special URL address to view the gifts. If you're not already a newsletter subcriber you can join now - look for the sign-up link on the right hand column. Tell your friends! I love to give gifts!!


From Your "Christmas Carol"

Leather Look Tags


I was at a craft fair a couple of weeks ago and took along a few supplies to work on and demonstrate. Included were precut topnote dies in Kraft Cardstock, Soft Suede Classic Stampin pad, Winter Post Stamp set, Jumbo eyelets and my Crop-A-Dile. This is what resulted:


While my photography doesn't really show it that well, several people thought for sure I was using real leather for my tags because of the colour and the sponging that give it that effect. I was very pleased! I also have several people interested in making these tags because they are so easy.

Hope you like them!

Cheers
Carol

28 Oct 2009

My Digital Studio

I've been busy! Getting ready for a Christmas craft fair, holding classes, and using My Digital Studio! Today I want to show you the first card I made using MDS. It's so much fun to use and a great design tool.

I used Real Red cardstock for the base and DSP from the Christmas Jingle Simply Scrappin Kit (not just for scrapbooking!) The snowflakes are from the Snow Burst set (it's retired but one of the advantages of MDS is that it includes some of the retired sets!) The sentiment is using a font from my own computer - Monotype Corsiva. The ribbons and brads are all part of the MDS and never run out!!

My Digital Studio is really user friendly - I started loading the program at 3 pm, and finished the card less than an hour later. AND I'm no computer wizard by any stretch of the imagination.


I hope you like it! I'll be back soon with photos of projects I'm making for the craft fair.
Happy Stamping!
Carol

7 Oct 2009

Canadian Thanksgiving

Our Thanksgiving holiday in Canada is October 12th this year (always the second Monday of October). We'll be having roast turkey with all the trimmings, plus apple and pumpkin pie. We have so much to be thankful for here in North America and I decided to use that as a theme for one of my classes.

One of the projects I did at our last 3-D class was this Gratitude Journal. I've seen a variety of this type of journal around and thought it would be fun to create a personalized one. I chose the Autumn Traditions Designer Series Paper from the annual catalogue (love these maple leaves and the colours in general). The books were purchased at a craft store and then we used the DSP to alter the cover and decorate divider pages that we added using Stampin' Up!'s spiral punch which works perfectly for the double wire binding.


Inside I divided the lined pages into five sections. The first was labelled 'Thoughts' using the Round Tab punch. Here I plan to include thoughts on gratitude - both from quotes as well as my own.


The next section is labelled "People" and here I will write about the people I am grateful to have in my life and why.


The third section is labelled "Things" and while I try not to be materially minded, there are things that I greatly appreciate! Think washers and dryers, electricity, Stampin' Up! tools! I will record these here so that I don't take luxuries such as these for granted.


The next label is "Understanding" and here I hope to record what I have learned from and about gratitude and how it has changed my life.


Finally I have a section about myself, and the talents and skills that I am grateful to have and learned.


The book is 5x5 and all the pages are lined so it is small enough to keep on my night table or in my tote bag, and I think it looks really cute with the DSP and tags!

Everyone who made one at class chose their own themes for the sections. One young girl decided she was going to make it all about her Dad and why she was so thankful for him. Another lady was going to divide it using her grandchildren's names and make notes of why she was grateful for them. Everyone had a different idea for how to use it and they were all really interesting. I hope you will find a use for a book like this too.

Cheers
Carol


3 Oct 2009

CHRISTMAS PLANNER - Altered File Folder

Here are the directions for making a file folder into a thing of beauty, plus it's useful too!

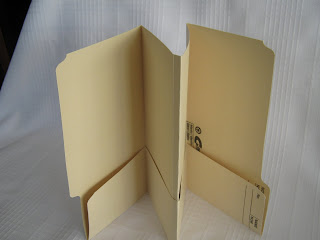
You start with a regular letter size file folder...

Fold it in half so that the tabs line up with each other like this:


Use your bone folder to make a sharp crease as it will want to keep reverting to the original crease.
Now fold it in half, lining up the fold at the bottom of the tabs, as shown here:


Crease it sharply and then open it out flat. Fold up the bottom section so that the bottom comes to the top of the shortest tab:


This is actually folded up on the wrong side in this photo so you can do it the opposite way, in any event it will work itself out when you fold it all together...


See how the short tab is on the right hand side above... well I actually want that to be the front of my planner not the back page, so if you flip the bottom fold to the other side the back page becomes the front page and it works.... clear as mud, right?!

You can leave it accordian style, but I prefer to attach the centre fold together with sticky tape so that it looks like the completed project on the right:


Now all you have to do is decorate your basic planner with stamps and/or Designer Series Paper, and labels. I printed the labels I wanted onto Whisper White cardstock with my computer and then attached them to the planner. Here is how the inside looks:


I attached calendars for November and December on the left so that I could mark the days that I have committments - workshops, classes, parties, family events, etc. The pocket at the bottom will hold invitations, and other info I'll need (time, directions, etc.)
I have a section for recipes and menus because I always run across things I want to try at Christmas parties (if the hostess will share her recipe!!) and sometimes I clip things from magazines and newspapers too.

In the third section I have tucked an envelope (don't you love the red!!) to hold receipts for Christmas gifts in case something has to be returned or exchanged (my fault for choosing incorrectly so I want to be able to fix it!) The last section has a list with gift recipient's names and ideas for their special gift.


I hope you'll give this a try. It's really easy and fun! And if you would like to have it as a class, just give me a call!
Cheers
Carol

2 Oct 2009

More Samples from Mini Convention

It's so inspiring to share ideas with other crafters, I'm re-energized! There were so many impressive 3-D projects on display that I want to re-create. Look at these:


This scene is made with our clear Window Sheets and snowflake rub-ons.


This Christmas tree was stunning in real life, but loses something in the photography. It is made with the Bigz XL "Pennant" die in the Big Shot, along with the "Join in the Cheer" die and the Snowflakes die and punch.


I'd better get busy!!

1 Oct 2009

YOU'RE INVITED TO JOIN MY TEAM


Have you ever considered becoming a Stampin' Up! Demo? It's an interesting, challenging business you can run from your own home, on your own schedule. And now Stampin' Up! has added another Starter Kit that includes the "My Digital Studio" - a computer program that does more than digital scrapbooking, you can make cards, calendars, videos and movies too! All using SU's colour families and products.

If you would like more information just contact me, I'd love to have you on my team!

Cheers
Carol

Mini Convention

Last Saturday I attended a mini convention here in Truro with 40 other Stampin' Up! Demos. It was such fun, and sooo inspiring. We each provided samples of our work for display and here are some of the beautiful cards I photographed.

I love the colours in this one. The Stamp set used is "Autumn Splendour" from the Holiday Mini.


And isn't this one adorable! She used the Sizzix Scallop Circle for the base, and the stamp set is "Great Friend" from the Idea Book & Catalogue.


This one is made with the "Herb Expresseions" stamp set, my next 'must have'! The Designer Series Paper is from the "Thoroughly Modern" package.


I'll have more items to show you from the convention soon!

In the meantime be sure to check out the new Deals of the Week and the Clearance Rack available on my SU website: http://www.attherookery.stampinup.net/:


Cheers
Carol

AND THE WINNER IS...

I had such a great response to my Staples Small Business Display that I decided to give TWO prizes!
This is Mike Tapp, Business Support Manager at the Staples Business Depot in Truro drawing the first name......


LAUREL HEBERT!

And here is Mike drawing the second name.............


MICHELE ROGERS!

Each winner receives a 2009/10 Stampin' Up! Idea Book & Catalogue and a $25 Gift Certificate for Stampin' Up! products.

Thank you to everyone who took the time to visit my display and enter the contest.

19 Sept 2009

Sweet Cups Candy Card

As soon as I saw the "Sweet Treat Cups" in the Holiday Mini I knew I wanted to give them a try - for my granddaughter, my neice and nephews, and for my readers and customers. So this is my first creation using the cups and the "Sweet Centers" stamp set. I also used DSP from the Nouveau Chic set. The card base is Pumpkin Pie and the mat Basic Black.


But then of course I had to figure out a way to get the candy out without tearing apart the card! I had a few ideas from reading other blogs and here is what I did. On the inside of the card behind the candy and treat cup and hole, I mounted more DSP on Basic Black and using the 1 3/4 punch cut a hole in the middle. Using dimensionals I attached them lining up both holes. Then I cut a piece of cardstock that fit the length and width of the space made between the dimensionals and slid it underneath the DSP to cover the hole - leaving it long enough to protrude out the left side. The circle I punched from the middle of the Ghouls and Goblins stamp used on the front I glued to the sliding cardstock so that it would hold the correct placement of the slider. I printed out 'Pull for Candy' on Whisper White and glued it to the end of the cardstock, and also stapled a piece of Pumpkin Pie 1/4" grosgrain ribbon.

For the greeting side of the card I used the new stamp set "Twick or Tweet" to stamp the skeleton and pumpkins.


The photo on the left shows how the slider pulls out to allow access to the candy (and to refill if you need a sugar fix before you send it!)
Although this looks a little complicated, once you figure it out the first time I think it will go much faster when you do another - and I plan to! The stamp set "Sweet Centers" comes with a heart, petals and leaves, hot air balloon basket, and ornament topper so it will be convenient for most holidays and everyday!
I hope you like it!

17 Sept 2009

New Stamp Set, New Impression Folder

I get so excited when the courier stops at my house - because it means new Stampin' Up! toys for me!
Today I made a Christmas card using two new products, one is a stamp set from the Idea Book & Catalogue called Tree Trimmings, and the other is a new Impressions Folder from the Holiday Mini catalogue called Petals-A-Plenty. It makes a beautiful deep impression on the card stock and has become my new favourite! I chose traditional Christmas colours - Old Olive, Real Red,Very Vanilla, and Chocolate Chip. The sentiment is a retired one (but the only one that would fit because I didn't check until the card was finished!)
What looks like jagged cutting on the bottom of the Real Red cardstock is actually shadows from the deep impressions. And it has a wonderful textural feeling as well.
Hope you like it!
Carol

16 Sept 2009

Dasher and leftovers...

Today I was tidying my craft room and came across some partial kits leftover from a previous class. I really liked the colour combination so I thought I would use the base cardstock (Kraft) and the matting (Bravo Burgundy) along with the top note die cut in Kraft. The ribbon is Kraft Taffeta.

I wanted something quick and easy so I decided to emboss 'Dasher' in gold on the top note die cut. Dasher is one of the Back Page Under $12 stamps and I think he's divine!


This close up photo shows Dasher's shine more clearly. It's a simple but fun card.
Hope you like it!
Carol

15 Sept 2009

One Stamp Set - Four Ways

My Christmas Card Classes have begun and I chose "Scenic Season" as the set for the September class. Although it has only one main image you can obtain a variety of cards by changing up the colours of ink and paper or by using designer paper, embossing, and so on. I tried a few variations before I settled on one for class.
This is the first, in traditional green (Handsome Hunter) and red (Real Red). As you may have noticed I removed the sentiment from the main image (it is normally on the lower right corner) so that I could place it in different areas.
My second card is also traditional red and green (Real Red, Handsome Hunter)
This third card is cased from Jan Tink, using Bravo Burgundy, Old Olive, and Whisper White cardstock, Next to Navy and Bashful Blue ink. The ribbon is Old Olive. The sentiment is from another set (the name of which eludes me at the moment!) I do really like the moon in this one.
Finally I settled on this card because I'm becoming more and more fond of the Soft Suede In Colour and I wanted an excuse to use some of this pretty designer paper - from the Christmas Cocoa Specialty set. I used Real Red as the base cardstock and to ink the sentiment. Now I'm hoping my SU order will arrive early enough tomorrow that I can experiment with the Frost White Shimmer Paint and use a bit to add some glitter to this card as well.
Hope you like it!
Cheers
Carol

14 Sept 2009

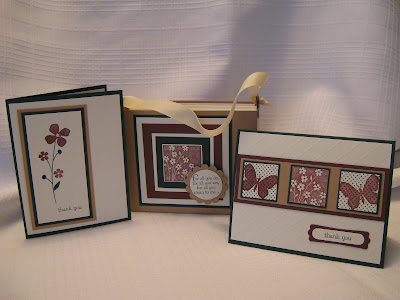
Card Set - For All You Do

Hello - Happy Monday!
I had some time to just play around over the weekend and put together this card set and holder. The stamp set used is the very versatile "For All You Do", and the colours I chose are Bravo Burgundy, Handsome Hunter, and Creamy Caramel.
I really like the variety of stamps in this set - everything from the long stemmed flowers to the blocks of small flowers and polka dots. Along with a butterfly. As you can see they can be put together in several different ways.

Hope you like it!
Cheers
Carol