30 Apr 2013

Punched Flowers Class

Oh we had such fun last night! My husband even came in to see what we were laughing about but it was just crafting + seven women = Fun!

In the class we made six different flowers using Stampin' Up! punches to create the petals. There were carnations, pansies, roses, sunflowers (small), magnolias/water lilies (we couldn't decide) and another carnation type made with the Creped Filter Paper.


I'll show you three of the flowers today.

This is a familiar and easy punched flower to make. Punch out six pieces from Daffodil Delight using the
1 3/4" scallop circle, put them all together and punch a hole in the center for the brad, then take them apart, scrunch them up, open them up, stack the circles and insert the brad. Then layer by layer scrunch the  petals up and around the brad. Adjust petals to your liking.

You can do the scrunching with just your fingers, but if (like me) you have some arthritis in your fingers you might want to spritz the cardstock with water after you punch the holes in the center and before you start scrunching - it makes it much easier.

Now that we have three sizes of Scallop Circle punches (7/8", 1 3/4", and 2 3/8") you can make a whole garden of carnations!

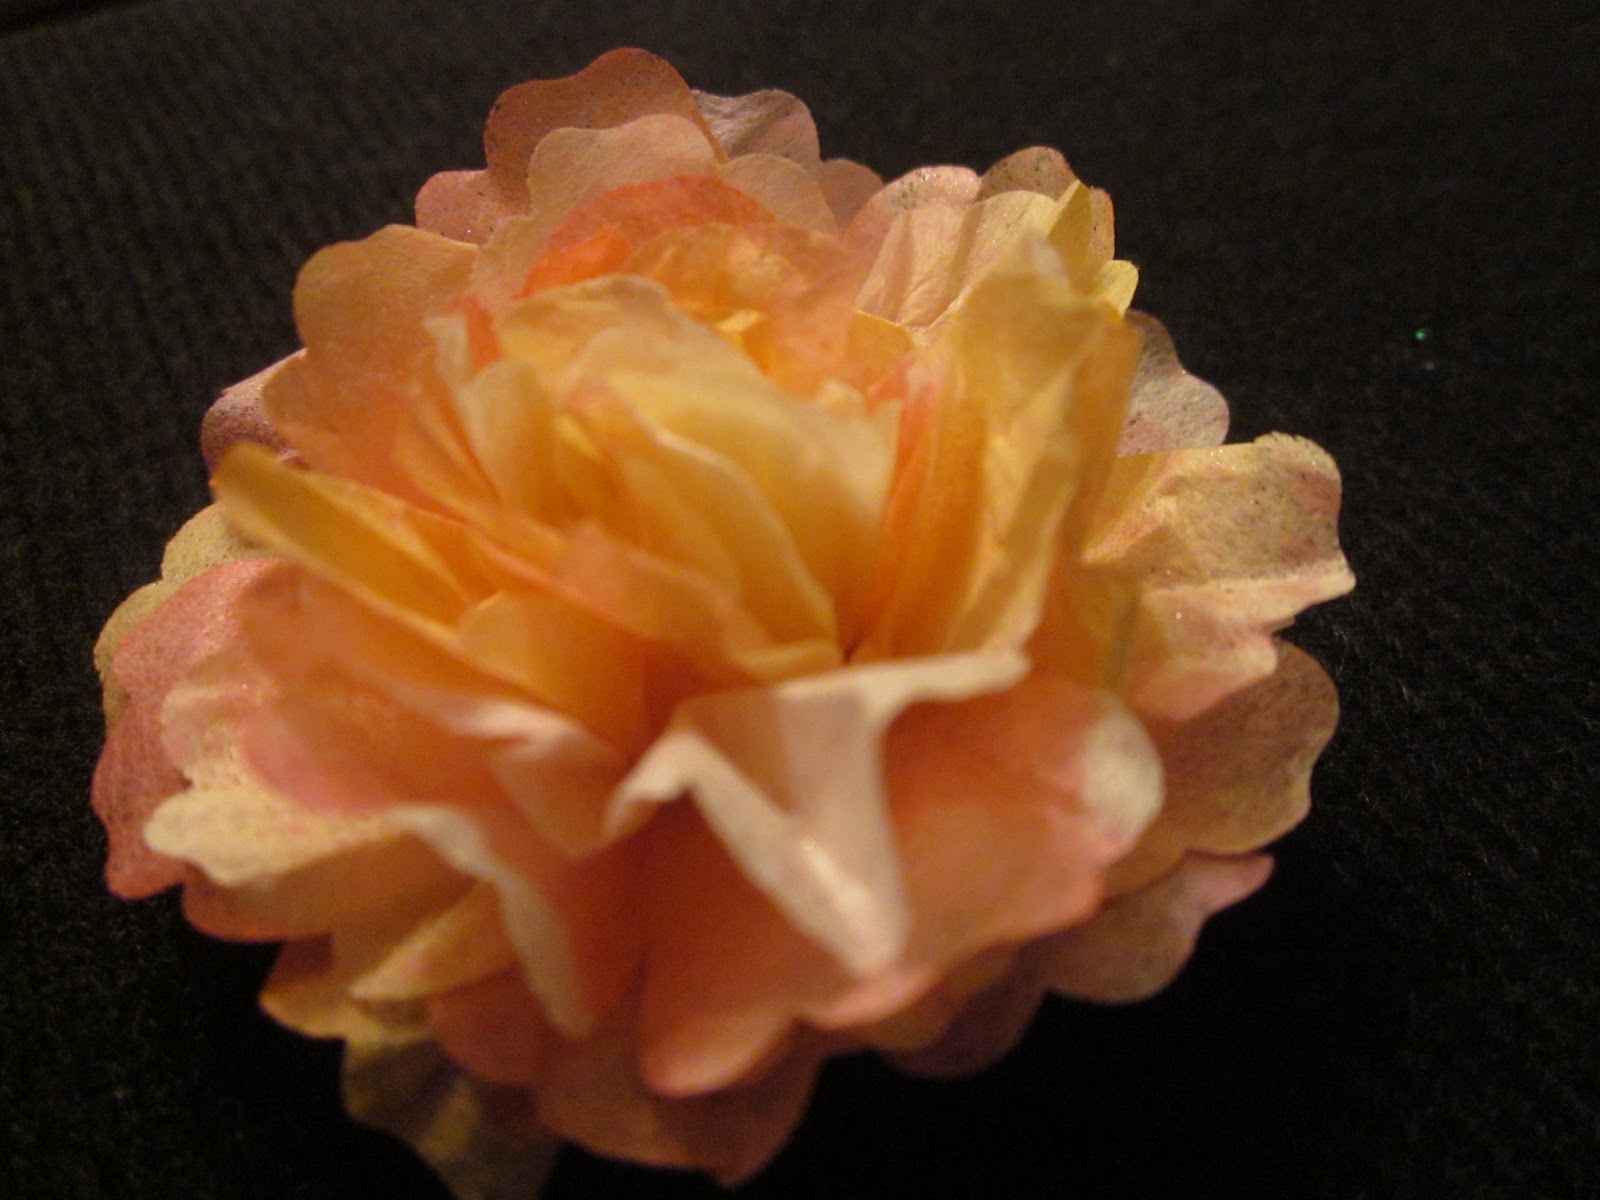
The second flower used the Creped Filter Paper. I punched the circles using several different punches - four of the Blossom punch, four of the Fancy Flower punch, 2 of the 1 3/4" scallop circle, and 2 of the 7/8" scallop circle. You can punch two layer of the Creped Filter Paper at once but you need to add a piece of regular copy paper/printer paper underneath when you punch. Otherwise the punch will only tear the Creped Filter paper.

I layered them all together and punched a hole in the center with the smallest hole punch of the Cropodile. Then layer by layer starting at the top layer I scrunched the petals together. Once all layers are done you can arrange the petals as you wish, the bottom ones flatter and the top ones together so that the brad doesn't show.


I found out how to do the beautiful colours from Patty Bennett. You can watch her tutorial here.
Right after you read the rest of my blog post! 

I think it was making the rose that brought the most laughs... Not sure why, something to do with it being the last flower of the night, and cutting off the owl's feet...? :)

The cardstock is Real Red and the leaves Gumball Green. The outside rose petals are made using the Owl Builder punch, and the center using the 1 3/4" Scallop Circle punch. The base to which you attach all the petals is a 1 3/8" Circle punched in Real Red. Curl the petals with your bone folder


For the center, cut the Scallop Circle into a spiral, then roll it around a wooden skewer, or small knitting needle or some such thing. Once it is fully rolled let go and let it relax, you may even need to spread it out a bit so that it fits the space in the middle of the owl petals. Then glue it into the center. You can use the Tombow Multi Purpose glue or a Glue Gun. (Tutorial is here - but don't leave yet!)

Finally we spritzed it with a mixture of 70% Rubbing Alcohol and a dollop of Frost White Shimmer Paint.

Drop by tomorrow to see the last three flowers!

Happy Stamping!
Carol


26 Apr 2013

Fun Promotions Ending April 30th


Just a quick reminder for Stampin' Up! specials that are ending this month - April 30th 

NEW This and That
This-and-That-DO

Stampin' Up! is happy to introduce a new product line called "This and That"!  It will debut in the 2013-2014 annual catalog.  BUT they are giving us the chance to get these exciting new products starting today.  

Purchase This and That products separately or get the sneak peek This & That Bundle and save 15%.  Special Priced Bundle Dates:  March 23-April 30 
NOTE:  the bundle will not be offered in the new catalog
__________________________________________________________

NEW Sent with Love Products
Sent with Love DSP Favorite, stampin up, dawn olchefske, dostamping, travel
Stampin' Up!'s new Sent with Love products all-new travel-themed products are perfect for documenting family vacations, creating unique invitations, or myriad other fun paper-crafting projects! Available thru Apr 30th. Click here for more details.

Happy Stamping!
Carol


Have you had a chance to look over the retirement list yet? If not, you can see it here.

There are lots of stamps sets I will miss!

Knowing that I wouldn't be able to use French Foliage in class or at workshops after June 1st, I decided to use it for last week's Hostess Club.


And here's another card I used it on a while back:


I like it because the leaves are so life like, especially when you stamped them on vellum cardstock.

Make sure if you like any of the retiring products to get them soon, already several items are sold out!

Happy Stamping 
Carol
 

24 Apr 2013

The Retirement Lists are Posted!!

WOW!


Retiring Accessories reduced 25%-40%!!
 Paper, Ink, Punches, Big Shot Dies
Get them before they are gone.........
April 24-June 3, OR WHILE SUPPLIES LAST.

Click Here to see the full lists of retiring products.

These are just a few of the products retiring:


You can order directly on-line, or contact me as I will be sending an order at Noon today (Wednesday).

Happy Stamping!
Carol

21 Apr 2013

Be Prepared - the Retirement List is coming


Every year prior to the new annual Stampin' Up! catalogue becoming available, SU gives us a list of items - stamps, paper, tools, embellishments, etc. - that are going to retire and will no longer be available. 

This year the list comes out on April 24th. I'm giving you a "heads up" because often some of the popular items are sold out the same day - so if there is something you have been planning to acquire and you see it on the retirement list - I suggest you order it right away to save disappointment.

I will post the list on here and send it to my customers as soon as I receive it myself.

Happy Stamping!! 
Carol

More ASI Team Meeting shares

As you've heard me mention many times, our team meetings are so much fun and so inspiring. We count the days from one meeting to the next. Here are more photos of ideas we found and shared at our last meeting:


Isn't this tissue holder adorable? It would make you feel good every time you used it - and you can't say that for a regular plastic package!


And you can give a coordinating get well card with it.


Sandi shared how to make a classy package of note paper for your purse:


It's little things like this that can make people (including yourself) feel special when they use them.


Here's a happy little birthday bag for a 'wee gift' compliments of Maree, my Kiwi 'daughter'!


And from Linda here's a different use for the Pop & Cuts die - a special gift box!


This little treat box/table favour is just so darn cute!!


So I hope you enjoyed seeing some of the things we do/create/learn at our meetings. (Sharon I hope you can join us for one!) If you would like to join us, just contact me about becoming a demo - there are so many fun benefits! Meetings with other demos, sneak peeks at upcoming catalogues, pre-ordering from catalogues, products you can earn, plus your demo discount. I'd be happy to answer any questions you might have.

Happy Stamping!
Carol

20 Apr 2013

A Perfect Black and Summer Starfruit card

Here is a card that was inspired by Yvette Ashe, and it would be exactly the same as hers except that I left something out accidentally!

It uses the colours Basic Black and Summer Starfruit - my old MRHS* highschool colours - no wonder I like the combination!


I love this design, and sentiment!

And because I left something out, this card has a sister:


It's the same colour combination but using a different stamp set. Thank you Yvette for sharing your ideas and inspiring me to use them!

Products used:
Cardstock: Basic Black, Whisper White, Summer Starfruit
Designer Series Paper: Sycamore Street (Sale-a-bration)
Ink: Stazon Black
Stamp Sets: Just Thinking, Vintage Verses (Sale-a-bration)
Punches/Dies:  Dotted Scalloped Ribbon Border punch, Apothecary Accents Framelit, Window Frames Collection Framelit.
Embellishments: 3/16" Neutrals brads,  3/8" Stitched Satin Ribbon - Summer Starfruit, Essentials Paper Piercing Pack, Paper Piercing Tool, Basic Black Marker

*MRHS - Musquodoboit Rural High School

Thanks for visiting - hope you come back again soon!

Happy Stamping!
Carol

19 Apr 2013

Pool Party & Blushing Bride

This is a card made by Maree, one of our ASI team members. I simply love the colour combination! Blushing Bride had been a favourite of mine when it was an In Colour a few years ago, but I was surprised to see how well it goes with Pool Party - a match made at a wedding reception by a pool I guess!


Maree is always great with colours so I'm glad she shared this combination with me. (Two of my favourite colours and I probably would never have tried them together!)
You can see more of Maree's designs on her blog www.inkymoose.blogspot.com. Be sure to check it out!

Products used:
Cardstock: Blushing Bride, Pool Party, Early Espresso, Whisper White
Ink: Pretty in Pink, Early Espresso, Wild Wasabi
Stamp Sets: Blooming With Kindness, Up In The Air (Retired Hostess)
Embellishments: Cloudy Day Textured Embossing Folder, Apothecary Accents Framelit, Scallop Edge Border Punch, Window Frames Collection Framelit, 3/16" Brads Neutrals Collection

Happy Stamping!
Carol

15 Apr 2013

Card Shares from our ASI Meeting

Hello Everyone!

I want to share some of the beautiful cards that were brought to our last team meeting. We had a 'show and tell' time and there were lots of ooh's and ah's!

Here are a few:


And here we are working hard (but loving it) in Linda's beautiful new craft room!!


If you have ever thought about becoming a Stampin' Up! demo - hobby or business - be sure to ask me any questions you might have. We'd love for you to become a part of our group!

Happy Stamping!
Carol

Hostess Benefits PLUS!


Stampin' Up! is outdoing themselves with their 25th Anniversary promotions! 

The newest one is for Hostesses who hold a $400 or above workshop - $40 EXTRA IN HOSTESS DOLLARS!!! (Want to know more about hosting a workshop? Click here)


OR

If you've been thinking of signing up to be a Hobby or Business Demonstrator you'll get an EXTRA $40 worth of product in your kit!!! (Want to know more about becoming a demo? Click here)


But it's only from today (April 15th) until May 30th... contact me to book your workshop or sign up now!!!


Happy Stamping!
Carol

14 Apr 2013

Third WOW card

The final WOW card this month is called a 'Hidden Door' card. Now this was new to me, but others learned it in their childhood! In any case, it's a fun and easy card to make.

From the outside it looks like a regular gate fold card:


When you open the 'gates' you see the woven back:


And when you fold the center together you can find the 'portal' to the secret door! Open it up to can see all the secret messages...


 My husband thought if he turned the card over he would see the messages on the back, but NO! They are truly hidden!


So if you would like to learn how to make this card with a secret door, click on this link:
 http://www.youtube.com/watch?v=KeSbbYawZDY

Supplies Used

Cardstock: Very Vanilla, Calypso Coral, Lucky Limeade
Designer Series Paper: Tea for Two
Ink: Calypso Coral, Lucky Limeade, Black Stazon
Stamp Sets: Petite Pairs, Ciao Baby
Punch: Petite Curly Label (Sale-a-bration, also available in new catalogue in June), 7/8" Scallop Circle, 1" Circle
Embellishments: Roses from Artistic Embellishments Kit, Calypso Coral Bakers Twine

I hope you enjoyed this month's WOW cards! Leave me a message to tell me which one you liked the best!

Happy Stamping
Carol

13 Apr 2013

WOW Card #2

This second card I've admired for two years! I saw it at a Regional Meeting and thought it was so darn cute!

Here is the front - no hint of what you will find inside:


Then you open the card to find...

A whole flutter of butterflies!

They are suspended on strips of window sheets, which allows them to move around...

Tomorrow I'll show you the 'secret door' card.

Supplies Used:
Card stock: Daffodil Delight, Wild Wasabi, Melon Mambo, Pacific Point, Whisper White
Designer Series Paper: Sunshine and Sprinkles
Ink: Melon Mambo
Stamp Sets: Feel Goods, Friendly Phrases
Dies: Floral Frames Framelits
Punches: Elegant Butterfly, Bitty Butterfly
Miscellaneous: Window Sheets, Rhinestones


Happy Stamping!
Carol

12 Apr 2013

These cards will make you say WOW!

Hi Everybody:

We had our monthly Wednesday WOW! class this week, and made 3 fun cards. I keep looking for new projects that my group hasn't done before and these were new to all but one of the group.

The first card is a Star Fold card:


I really like the pattern and colour combination of this Tea for Two Designer Series Paper.

And the roses and pearls really give it an elegant air:


When you unfold the card there is a message inside:


And whether opened or closed, it looks lovely.


Here is a list of supplies used:

Cardstock: Very Vanilla 12" x 12", Gumball Green
Designer Series Paper: Tea For Two
Ink: Riding Hood Red, Gumball Green
Stamp Sets: Feel Goods, Elements of Style
Punch: Bird Builder
Embellishments: Basic Pearls, Roses from Artisan Embellishments Kit

Please contact me if you wish to order any supplies for this card.

You will find a tutorial with directions for making the card here:
 http://www.cliona-at-night-owl.blogspot.ca/2011/10/star-card-tutorial.html

I hope you enjoyed it! I'll show you our second card tomorrow!

Happy Stamping
Carol

4 Apr 2013

COLOUR REFRESH!


In 2010 when Stampin' Up! did the big colour renovation they shared their plans for smaller colour refreshes every three to five years to keep the colours on trend. 

Well it has been three years and we are excited to announce that the upcoming 2013-2014 annual catalogue will include 10 new colours (most of which are returning "In Colours" from previous years.

Be sure to stock up on your favourite Discontinued Colours (Ink pads, ink refills, markers, card stock) before they are gone!


Colors Retiring/Discontinuing:
§ Regal Rose
§ Pretty in Pink
§ Bashful Blue
§ Certainly Celery
§ Baja Breeze
§ Riding Hood Red
§ Bravo Burgundy
§ Not Quite Navy
§ More Mustard
§ River Rock
§ Lucky Limeade (2011/2013 In-Color)

ALSO

Due to unforeseen problems with the supplier for Watercolor Wonder Crayons and Watercolor Pencils, SU has decided to discontinue these two products.


Watercolor Pencils (item 101879) and Watercolor Wonder Crayons Brights Collection (item 119804), which have been on the Backorder Report for about a week, will no longer be available, effective immediately. 

Now for the good news! We still have the remaining collections of the Watercolor Wonder Crayons available to order. The Subtles (item 119802), Neutrals (item 119805), and Regals (item 119803) Collections are only available while supplies last. Get 'em before they're gone!
PLUS...

Stampin' Up! is offering FREE shipping on EVERYTHING April 6-8th, so contact me today to place your order for this weekend!

Happy Stamping!
Carol