19 Oct 2011

Christmas Gift Pack

I would say this was the favourite project that we made on Sunday, and it's so versatile too! This one is made to give to a friend or co-worker.

This one is made with Garden Green and Very Vanilla cardstock, with Designer Series Paper from the Holly Berry Bouquet package. The scalloped square in the middle is from the Squares Duo die, and the brad is from the Clearance Rack. Unfortunately the Real Red striped ribbon is retired, but it's available in many other colours. The stamped image is from the Pines & Poinsettias set.

Inside are two pockets to fill:


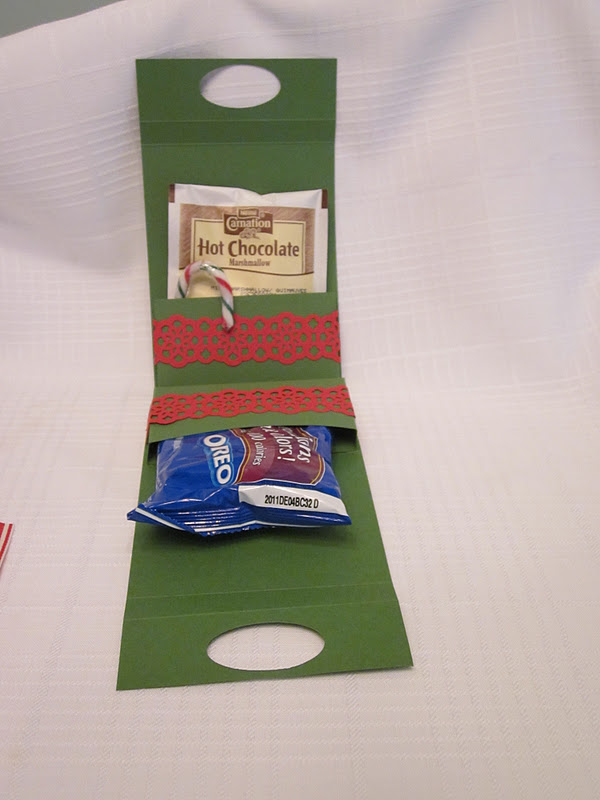
I put a packet of Hot Chocolate and a candy cane and Thinsations Cookies in mine. But you can use whatever fits - Cup-a-Soup for a 'get well' pack, or homemade goodies, there are lots of possibilities.

For those of you who want the directions I have given the measurements below. I received one from another demo and 'figured it out' from there, so I don't have a tutorial as such.

The dimensions for the front and back are 4 1/4 inches wide and 8 1/4 inches long, score on the long side at 1", 6 1/2", and 7".

Fold the 1" score on each piece and attach (glue/snail/tape) on top of each other - this forms the bottom making the pack 1" deep.

The two scores on the top form shoulders and top. Hold the top section evenly together and punch through both pieces with the large oval punch (not the extra wide).

The inside pockets are cut 6" wide by 4" high, score at 1/2" and 1" along one long side (bottom), and at 1/2" and 1" on both of the short sides.

Cut the corners out of the pockets...cut up from the bottom to the second score line, and in from both sides to the second score line.

Fold along score lines, place tape on all outside sections of folds - two sides and bottom. Take the outside section already made, set it on the table and hold up one side. Place the first pocket evenly on the bottom and attach the pocket to the side of the packet. Do the same with the second pocket.

Then you can decorate however you want!

Happy Stamping!
Carol

18 Oct 2011

Christmas Shaker Card

Another one of our projects at the full day class was this Shaker Card.

 The new Shaker Frames in the Holiday Mini catalogue make these cards so easy to make! Simply stamp your image on a piece of cardstock (mine is one of the penquins from the stamp set Polar Party) and punch it out slightly larger than the shaker frame you intend to use. Attach the shaker frame circle to the image and add a few pieces of Mica Flakes or some other filler. Remove the paper from the top of the shaker frame circle and attach a slightly larger piece of window sheet over the opening. Decorate with a frame and attach to the front of your card. Done!

This card uses Next to Navy and Bashful Blue cardstock. The embossing folder used is Snow Burst.

Hope you try one of your own!

17 Oct 2011

Projects from my Sunday Class

My annual full day Christmas class was held on Sunday - we had a lot of fun, a lot of laughs, and made lots of projects. Thank you to everyone who attended and made the day such a success!

The first project I want to show you is the JOY banner or mantle topper. I love our Glimmer Paper and it takes centre stage in this banner:

The glitter doesn't show as well in a photograph, but in real life the letters POP!
The other colours used are Old Olive, Whisper White, Real Red, and the DSP is from the Letters to Santa package. The letters are cut using the Serif Essentials Alphabet die set.

I made the poinsettias with our Five Petal Punch and creased the petals down the centre a bit. The Silver Glimmer Paper in the centre was punched with smallest of the flowers in the Boho Blossom punch.

I used dimensionals to separate each flower to give it more 'substance', as if the glitter paper wasn't enough!!


Hope you liked it! I'll show you another project tomorrow.

Happy Stamping!
Carol

10 Oct 2011

Happy Thanksgiving Canada!

Today is our Thanksgiving Day and we have been invited to dinner at my husband's parents'. Which is wonderful because Brian's Mom is THE Best Cook! She makes the most wonderful turkey stuffing/dressing and her gravy is so good it could be eaten as soup. Plus she taught me how to cook squash so that I love it - brown sugar and butter!! And his Mom and Dad grow all their own vegetables so everything is super fresh and delicious. Did I mention they are 85 years old?!

Thanksgiving weekend is also our wedding anniversary weekend - October 7, 1972. And to make it extra special, three years ago our second granddaughter was born on our anniversary!

After all that celebration I have a little set to show you that I put together this week:
This set is made with the Berry Blossom DSP, and is a gift for those people who love to play cards.

The playing cards are housed in the decorated band aid tin.

And of course they'll need a score pad...
This was made by taking the measurements of the note pad, doubling the width plus 1/4" for the binding space. I used the backing sheet that comes with DSP to give it sturdiness and DSP to cover it.

Next I made coasters by building a 4" square sandwich of chipboard/Multipurpose Adhesive Sheet/DSP/Multipurpose Adhesive Sheet/Window Sheet. Then I ran it through the Big Shot using the 3 1/2" circle die.

With the Window sheet on top it makes the coasters water proof and you can clean the top with a damp cloth. So quick and easy to make! Now you can have coasters to match every event and celebration!

Finally I made an invitation so that friends could be invited...


Thanks for stopping by!
Carol

6 Oct 2011

Countdown to Christmas Calendar

OK, I've totally given up... you may see some other items from time to time, but I'm 75% Christmas... AND I LOVE IT!!!

I want to show you the Countdown to Christmas project I made with the 25 & Counting stamp set from the Holiday Mini:

I also used the Holly Berry Bouquet Designer Series Paper for the background, and the Ric Rac strip from the Tasteful Trim die to divide off the squares. I wanted to give it a cozy 'quilt' look.

The windows are cut with three of the designs in the Peekaboo Frames die (these are great for countdowns, cards, and scrapbook additions!).

I decorated the covers of the windows with the 25 & Counting stamp set and inside I had pasted an item for the child to do that day. (Layering order: DSP, Ric Rac, center words in squares, decorate windows and glue on top.)

Now the ideas are things that I used to do with my children, but they could be almost anything - including chores! (I've included my list of 25 items at the bottom of this post to give you an idea).


The cardstock colours used are Wild, Wasabi, Real Red, Chocolate Chip, and Very Vanilla.
This countdown calendar was made for a child under 10, but you could also make it for an adult.

The windows can be used not only for Christmas, but any countdown date: Vacation, Beginning of School, Birthday, Wedding.

List of window items:
1. Hug someone you love.
2. Sing a Christmas Song.
3. Make a snowman out of snow or marshmallows.
4. Smile at everyone you meet.
5. Put out some seeds or bread for the birds.
6. Write your letter to Santa Claus.
7. Do something special for a friend.
8. Draw or colour a Christmas picture.
9. Tell someone you love them.
10. Have an extra piece of dessert.
11. Make a Christmas tree ornament.
12. Make hot chocolate and read a Christmas story.
13. Make a Christmas card for someone.
14. Have a picnic lunch in front of the TV.
15. Call a friend or relative who lives far away.
16. Bake cookies with a grown up.
17. Give your teacher a Christmas card.
18. Wish someone a Merry Christmas.
19. Make gift tags for presents.
20. Ask people about their favourite Christmas.
21. Make a snow angel in the snow or out of paper.
22. Watch a Christmas show on TV - don't forget the popcorn!
23. Go for a walk or drive to see the Christmas lights.
24. Hang up your stocking.
25. Give thanks for all the wonderful things about Christmas.

Happy Stamping!
Carol

5 Oct 2011

Maree's Magic

You've seen several of Maree's wonderful creations before when she has visited, and this time was no exception. Here is a card she created from cardstock to completion while I was still wondering what to do:


This is the ornament she brought and shared with us - I was wondering how to put together the one in our Stampin' Success and now I know!

Maree's shoebox swap was an adorable 3 fold card using the heart punch to create the flower petals out of DSP:

And inside we stamped flowers and a sentiment. So cute!

Finally Maree created this cute shaker card:
I love the unusual colours, especially that Pool Party blue!!

If you want to see more of Maree's Magic just visit her blog "Inky Moose"!

Thanks for stopping by!
Carol

4 Oct 2011

Creations by Louise

This is the continuing 'stawry' of our Atlantic Stampers Ink meeting and all the wonderful projects that everyone shared. Today these beauties are created by Louise:
This card is made using a Window Sheet (p.216 IB&C) as the cover. It is stamped with White Stazon Ink (which won't smear once it's dry). Louise had another 5 or 6 amazing cards but I was so busy admiring them that I forgot to take photos! :0( But you can see them on her blog "Scrappin' Barn"

And then Louise double wowed us with this project, a fold up mini scrapbook or Over The Top card:
Each section was beautifully detailed:
and Adorable!!

And then you could fold it up flat!

Once we calmed down from all that creative excitement (you'd understand if you were here!), we made Louise's Shoebox Swap - a cute little notebook with pen. You can tuck it in your purse, or add magnets to the back and pop it on the fridge (the pages are removable).

See that cute little bear? His legs are all movable! Louise and I discovered we share a passion for teddy bears and she gave me this one (I named him Louie in her honour!). Louie rules my Stamping Studio!
Thanks for stopping by - don't forget to come back to see Maree's projects soon!
Carol


3 Oct 2011

Sandi's Creations

Here are some of the things that Sandi brought to share at our team meeting:


Our challenge this quarter was to make a Christmas Ornament using DSP, these are Sandi's 'discards'!!


I'll have to ask her how she got the stamp to match up so well!

And here is her final choice:
Imagine how that will sparkle on a lighted tree!


 Sandi's shoebox swap had us all oohing and aahing!!


This card was so sparkly and full of dimension...

And while it took some time to cut out all the leaves and ornaments, the end result was well worth it!

Thanks to Sandi for sharing her creativity!!

Carol


1 Oct 2011

What do Quick Cards, Big Shots, and Cookies have in common?

They are all available through Stampin' Up!'s October Promotions!!! Click on the promotion for more info!


For more information:


 For more information:
http://www.stampinup.net/esuite/home/attherookery/promotions

Cookies, and Pendants, and more!

Our ASI team is so much fun, besides all the creative stuff Linda brought to our meeting (see previous post), she also brought presents for everyone!!
 Inside the little velvet bag was this gorgeous pendant made with Polymer Clay and stamped with one of our Stampin' Up stamps. Each pendant was done in a different colour with a different stamp. Gorgeous!!


Plus she brought cookies!!! And not just any old cookie but cookies stamped with our new Cookie Stamps available to order today! The recipe comes with them too and they are delish!!
Linda, you spoiled us!! And we love it!!

If you would like to be a part of this Atlantic Stampers Ink team, contact me!

Thanks for stopping by
Carol