
I've had several requests for directions on how to make these mini scrapbooks using CD mailing folders and I am finally getting them posted! I used the Letters to Santa DSP and Quick Accents, but you can use any DSP or Simply Scrappin Kit (1/2 of a kit is plenty) to make yours.

Supplies:
3 CD Mailer Envelopes (see photos below for exact type) These can be ordered from www.uline.ca
Item # S-7073 125 for $39 plus S&H Proper name: CD Literature Folder
2 - 3 Sheets of coordinating Designer Series Paper
9 sheets of 8 1/2" x 11" cardstock in 3 coordinating colours (3 sheets of each)
4 3"x3" mini envelopes
1/2 package of Quick Accents, Side Notes, or half of the die cut designs that come with the Simply Scrappin kits. Alternatively you can use big shot dies, punches, and stamp sets to make your embellishments.
Directions:
1. Cut two pieces of cardstock or Designer Series Paper 5" x 10". These are used to attach the 3 CD mailers together. Score and fold the cardstock in half, fold the CD mailers on all the score lines.
Look for this type of CD Mailer:


Each piece of cardstock will go between two of the CD mailers. Use Tombow glue or Sticky strip to attach the pieces together. Make sure the CD Mailers are all opening the same way (diagonal pocket on the right hand side) Make sure the cardstock or DSP lines up with the back of the CD mailer so that the finished book will open flat:


Fold accordion style using your bone folder:


Attach all six pages to look like this:

Note that the red set of spines in the centre are empty:
Take your three 3" x 3" envelopes and cut off the flaps.

Cut three pieces of cardstock 2 7/8" x 2 7/8". Punch three pieces of scrap DSP using the Round Tab punch and attach to one side of each piece of cardstock.

Place the cardstock in the envelopes and tape to the three centre spines.(Alternatively you could use strips of cardstock cut 4 7/8" by 2") Note placement of envelopes:

Your basic scrapbook is now complete. All you have left is to add the embellishments and the photos. I will show you how I complete mine, but each scrapbook is unique and is only limited by your imagination (and stamp sets, and punches!!) :0)


There are a variety of closures for your scrapbook.
This one uses ribbon and jumbo eyelets:

This one uses ribbon and Velcro, with the closing on the front cover:

 The ribbon (twill tape) is attached to the edge of the front cover, wrapped around the completed scrapbook (leaving a little room for those added extras) and the Velcro closure is on the front.
The next scrapbook uses the same type of closure but it attaches on the back:


For this year's Letters to Santa mini scrapbook I simply uses stretchy silver cord, tied with a bow:

I hope you enjoy making your own mini scrapbook and I would love to see them!
Happy Stamping (and scrapbooking)
Carol

Supplies:
3 CD Mailer Envelopes (see photos below for exact type) These can be ordered from www.uline.ca
Item # S-7073 125 for $39 plus S&H Proper name: CD Literature Folder
2 - 3 Sheets of coordinating Designer Series Paper
9 sheets of 8 1/2" x 11" cardstock in 3 coordinating colours (3 sheets of each)
4 3"x3" mini envelopes
1/2 package of Quick Accents, Side Notes, or half of the die cut designs that come with the Simply Scrappin kits. Alternatively you can use big shot dies, punches, and stamp sets to make your embellishments.
Directions:
1. Cut two pieces of cardstock or Designer Series Paper 5" x 10". These are used to attach the 3 CD mailers together. Score and fold the cardstock in half, fold the CD mailers on all the score lines.
Look for this type of CD Mailer:


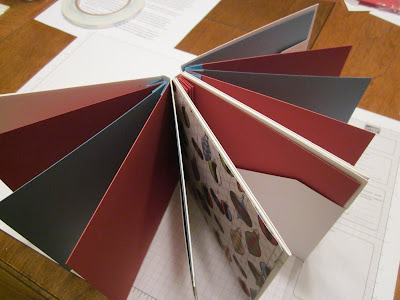
The finished basic book will look like this:

2. Cut three (not two as shown on photo) sheets of cardstock (one in each coordinating colour) 4 7/8" x 10". Score each piece on the 10" side at 1/2" inch intervals from 5" to 8" (5, 5 1/2, 6, 6 1/2, 7, 7 1/2, 8).

Fold accordion style using your bone folder:

Place each sheet into the Mailer pockets, starting with the large side first, then fold back the other page and slip the short side into the mailer:


DO NOT GLUE THESE PIECES TO THE MAILER. They must be able to slide so that your scrapbook pages will turn properly. They will stay secure in the pockets.
Cut 6 pieces of cardstock (coordinating colours or all the same) 4 7/8" x 4 7/8". Attach to the first set of spines and the last set of spines with sticky tape:


Note that the red set of spines in the centre are empty:

Take your three 3" x 3" envelopes and cut off the flaps.

Cut three pieces of cardstock 2 7/8" x 2 7/8". Punch three pieces of scrap DSP using the Round Tab punch and attach to one side of each piece of cardstock.

Place the cardstock in the envelopes and tape to the three centre spines.(Alternatively you could use strips of cardstock cut 4 7/8" by 2") Note placement of envelopes:

Your basic scrapbook is now complete. All you have left is to add the embellishments and the photos. I will show you how I complete mine, but each scrapbook is unique and is only limited by your imagination (and stamp sets, and punches!!) :0)


There are a variety of closures for your scrapbook.
This one uses ribbon and jumbo eyelets:

This one uses ribbon and Velcro, with the closing on the front cover:


The next scrapbook uses the same type of closure but it attaches on the back:


For this year's Letters to Santa mini scrapbook I simply uses stretchy silver cord, tied with a bow:
I hope you enjoy making your own mini scrapbook and I would love to see them!
Happy Stamping (and scrapbooking)
Carol
No comments:
Post a Comment