5 Sept 2012

You're Invited to the SUDSOL Blog Tour!

SUDSOL Blog Tour, September 6th


Hello Everyone - I'm so glad you've stopped by on the tour! I've got some easily demonstrable projects to show you!

All of the projects are made with product found in the Holiday Mini Catalogue.

The first is a card box, and I found the tutorial on the SUDSOL site (there are tons of tutorials, templates, and ideas there and many of them are unique to SUDSOL).

I wanted a box that would hold quite a few cards and this one will hold 20 simple cards and envelopes or 12-15 cards and envelopes that have several layers and embellishments.


It's a sturdy box too as it has 3 layers of cardstock on each side and top and bottom. 

I plan to make another 'year round' box and fill it with a variety of cards for a Christmas Gift.

Here are two matching cards to go inside


I love this Scentsational Season Stamp Set and the matching Holiday Collection Framelits Dies. 

Supplies used: Big Shot, Holiday Collection Framelits Dies, Scentsational Season, Snow Festival Designer Series Paper, Greetings of the Season Stamp Set, Champagne Glimmer Paper.
 

The next card uses the Frosty Friends Single Stamp. They are such a happy group of snowmen I couldn't resist them!
 This card would be easy to use at a workshop as there isn't a lot of colouring but it would give participants a chance to try out the Marvelous Markers.


And of course they need some glitter!

Supplies Used: Frosty Friends Stamp Set, More Merry Messages, Snow Festival Designer Series Paper, Basic Black and Whisper White Card Stock, Markers: Gumball Green, Cherry Cobbler, Crumb Cake, Bashful Blue, Dazzling Details.

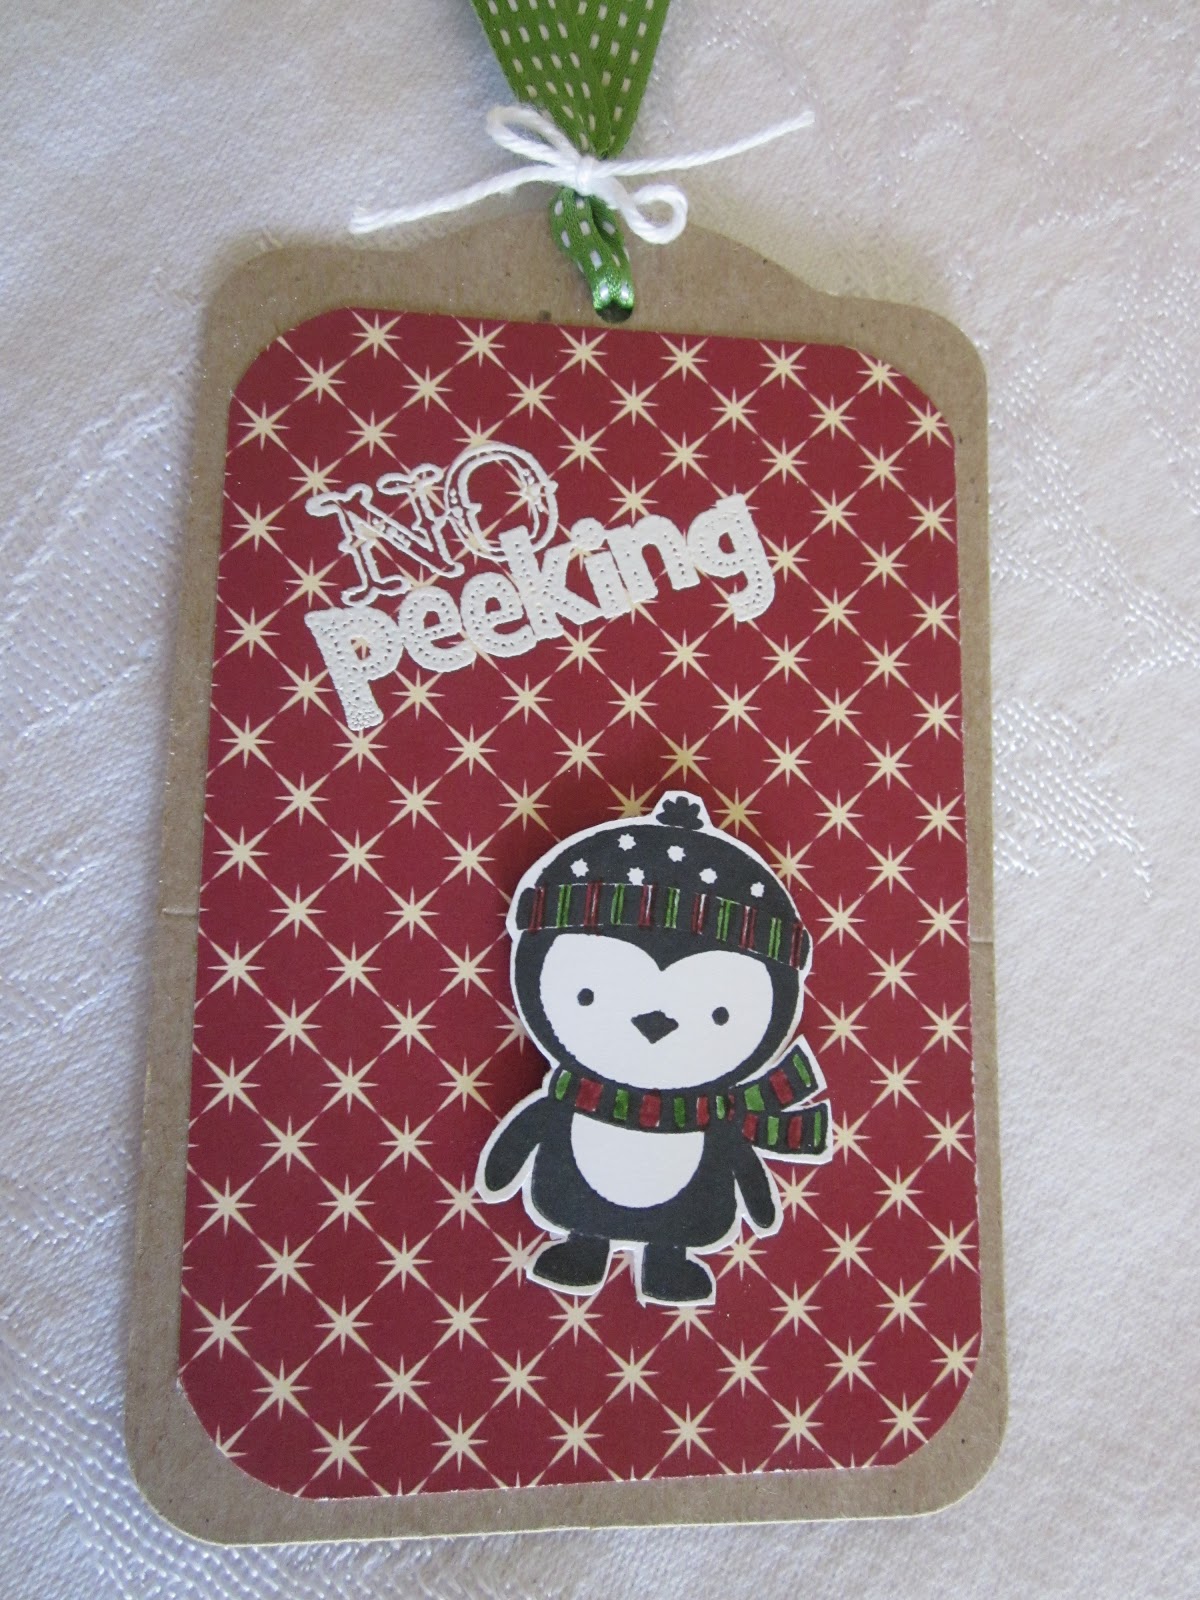
Finally I have two tags I want to share.
These tags use the No Peeking Stamp Set, another adorable and versatile set.


Supplies Used: Big Shot, Two Tags Die, Snow Festival DSP, No Peeking Stamp Set, VersaMark, White Embossing Powder, Black Embossing Powder, Dimensionals, Gumball Green Stitched Ribbon, White Organza Ribbon, White Baker's Twine.

If you're a Stampin' Up! Demo I encourage you to check out SUDSOL, and you can sign up for a two week Trial FOR FREE! 

It's a wonderful, supportive, demo community that loves to share ideas and help out with business questions and concerns. Plus all the tutorials, templates, business info, samples, etc. etc. etc. Check it out and see for yourself!

SUDSOL - 24/7 Upline


I hope you enjoyed your visit, and come back again soon!

Happy Stamping!
Carol

CONTINUE on the Blog Tour

3 Sept 2012

Rubber Boots

Hello!

I have discovered there are many names for what we Nova Scotians call "Rubber Boots"... Names like Gum Boots, Galoshes, Wellies (Wellingtons), Rain Boots. Whatever you want to call them, the boots in this tag made by Maree are cuter than any I've worn!

Maree (www.inkymoose.com) is all about the details - and I love how she has pierced the sun and cloud, and her choice of background paper!

These boots are from the Bootiful Occasions Stamp Set, and the background paper is from Comfort Cafe.

If you have another name for Rubber Boots please let me know!

And don't forget the upcoming SUDSOL Blog Tour!


There are 25 blogs on tour so you will see lots of samples filled with inspiration for you! I'm lucky #13 so be sure to visit on Thursday, September 6!

Happy Stamping!
Carol

1 Sept 2012

Back to "Spool" Time!

My next order is going in on September 4th - just contact me with your order before then!!

Happy Stamping!
Carol

Carol's Card Kits To Go! September Kit

This month's Card Kit to Go! 
 is a set of three whimsical Christmas Cards 
and three Card Tags.


Quick and easy, but sure to bring a smile! 

Why should you order them?


If you have a hard time attending classes, prefer to do your card making in your Pj's, or just want to make one card at a time, these kits are for you.

- If you want to get together with two or three friends during lunch time at the office, or at home on the weekend, these kits are for you.

- If you want to make a set of cards but don't have all the papers, die cuts, embellishments, or embossing folders, these kits are for you.

- These kits are also for you if you want to give a gift to a crafting friend or relative.


What you will find in your kit*:
ALL the card stock and Designer Series Paper you will need to complete the project – already cut to size and scored if necessary!!
EVERYTHING requiring die cuts, embossing folders, punches, etc. has already been done!
ALL of the brads, buttons, ribbons, and other embellishments are included!

A PDF of DIRECTIONS AND PHOTOS (11 pages, 32 photos) to help you complete the projects.

You need only use your own favourite adhesive, ink and stamps*

If you wish to purchase the die cuts, embossing folders and other products that I used, you will find a list included with the Pdf.

Stamp sets and ink to match the kit:

Stamps: More Merry Messages (#126400 W, $40.95; #126402 C, $30.95)

Ink: Gumball Green Classic Ink Pad (#126861 $7.25) Raspberry Ripple (#126859 $7.25)

*As an Independent Stampin' Up! demonstrator I am not permitted to sell unfinished stamped images.

The cost for this kit including 
3 Cards, 3 Card Tags, and 
an 11 page Pdf with instructions is
$25.00 


If you wish to purchase the Pdf with Instructions only
$7.50


Happy Stamping!
Carol

31 Aug 2012

Tutorial for sale for Autumn Wreath

 AUTUMN ACCENTS WREATH TUTORIAL
$5.00

Thank you to everyone who contacted me and asked if I would be selling a tutorial. Here it is!


This wreath can be made in different sizes, the one shown is 11" in diameter. Since I hate to purchase a tutorial and then find out there are tools that I don't have, here is a list of what I used.


Big Shot, Autumn Accents Bigz Die, Little Leaves Sizzlet, 1 ¾” Scallop Circle Punch, 2 3/8” Scallop Circle Punch, Glue Gun, Glue Sticks, scissors, piercing tool, artist’s paint brush, Sticky Tape, spongers, 6 gold brads.

The wreath can also be used as a centrepiece with a candle:


I had fun making this and plan to do more for gifts. 

If you would like to purchase the tutorial just click on the PayPal link below. It includes 13 pages of information and instruction, and 34 photos to make assembly easy!

30 Aug 2012

Autumn Accents Wreath

I thought of this project as soon as I saw the Autumn Accents Bigz die in the Holiday Mini Catalogue, and it's turned out pretty much as my mind saw it!

I love the colours, and the fact that it looks almost real but it will last longer than the real thing, AND I made it myself!


Hope you like it too. I hope to post a tutorial for sale in the next couple of days.

Happy Stamping
Carol

29 Aug 2012

Winter Memories Watercolour

Considering that I'm not that enamoured with cold weather, leafless trees, slush, and ice, it might seem surprising that I get all nostalgic about the 'magic of winter'.

But the winters I remember were magic! Beautiful snowfalls, piles of snow to play in, flying across the fields in a one-horse-open-sleigh (yes, I actually did that once!) It was cold, but it was beautiful!

Anyway, that's my lead in to today's card - an image from the stamp set "Winter Memories".


When I was small I had a sled much like this one (yes, I am that old!!) And there was a long, snow-covered lane just across the way from our house - wonderful to sled on! So this image really brought back memories.

The base of the card is Basic Black (8 1/2" x 5 1/2"). The Whisper White front is cut at 4" x 4 3/4" and embossed using the new "Lacy Brocade" embossing folder found in the Holiday Mini Catalogue. The eyelet strip below is made using one of the Finishing Touches Edgelits (p. 190 of the Annual Catalogue) and attaching to the bottom of the embossed sheet.

The Basic Black mat under the image is 2 1/2" x 4", and the water colour paper on which I stamped the image is 2 1/4" x 3 3/4".

The ribbon is Raspberry Ripple 3/8" stitched satin ribbon.

Although I'm not a super watercolourer, I want to share some tips on how I did it.

I used a piece of sturdy plastic cut from an overpackaged package for a base to hold my palate of colours. Then I used our Marvelous Markers to scribble some colour on the plastic. The image is stamped with Stazon Black Ink that won't run when you watercolour:


The colours are Raspberry Ripple, Certainly Celery, Gumball Green, Crumb Cake, Early Espresso, Tempting Turquoise, and Primrose Petals.

A Blender Pen was used to pick up the colour 

And add it to the image


When you are finished with a colour simply scribble lightly on scrap paper until the colour is gone, and then pick up a new colour.


After colouring the shed, I used Primrose Petals to colour in the cardinals.


Then I went over the cardinals with the Raspberry Ripple leaving the stomach of the cardinal slightly lighter.


Next I coloured in the sled's metal parts with Raspberry Ripple. As you can see the colouring is by no means perfect! But you can go back and fill in things as you notice them, or with the magic of the blender pen you can lighten areas by using a clean pen (after you have scribbled out all the colour) to pick up colour. Plus part of the charm of watercolour are its imperfections. (That's my story and I'm sticking to it!!)


The wooden parts of the sled were coloured in with Crumb Cake - in this case I used the actual marker as it is such a light colour.


Then using the Blender Pen and Early Espresso I added shading/dimension to the wood.


The bow was coloured first with Primrose Petals.


Then I added Raspberry Ripple to the outsides and centre of the bow as well as the ribbons.


And then using the blender pens moving in small circles I blended the two together, making sure to leave light areas (remember you can pick up colour if it gets too dark by using a 'clean' blender pen.) You really need good quality watercolour paper to do this as other types of paper will pill and eventually tear.


The wreath was coloured in two shades of green - first of all I used the Certainly Celery marker to colour the whole wreath.


And then coloured in leaves here and there with the Gumball Green to give it texture. I also used the Raspberry Ripple to colour in the berries scattered among the leaves.


After finishing the rest of the image I added glitter (Two-way Glue Pen and Dazzling Diamonds) to the snow.


There you have it!


I hope you like the card and found the tutorial helpful. And I also hope you have wonderful Winter Memories to enjoy!

Happy Stamping!
Carol


Retired Designer Series Fabric on Special!


Exciting Offer on Designer Fabric


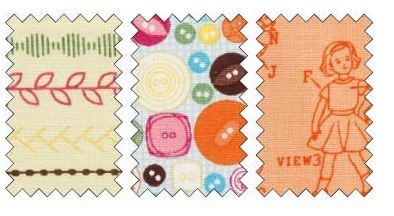
For a limited time and only while supplies last, the following discontinued Designer Fabrics from the 2011-2012 Idea Book & Catalogue will be available at the low, low price of just $1.19!

Item Description Price
121716 Deck the Halls Designer Fabric $1.19
121715 Candy Cane Christmas Designer Fabric $1.19
121817 Springtime Vintage Designer Fabric $1.19
121818 Sweet Stitches Designer Fabric $1.19


There is no limit to the quantity of these Designer Fabrics that you can purchase; however, this offer is only good while supplies last. 

Each package
■ Combines exclusive designs and colors with high quality fabric
■ Coordinates with other Stampin’ Up! products
■ Extra wide fat quarters -
28" x 18"
■ 100% cotton
■ Includes instruction booklet highlighting five projects you can create using fabric
■ 3 coordinated designs


Deck the Halls
 Candy Cane Christmas
 Springtime Vintage

 Sweet Stitches
Contact me if you wish to order!

Happy Stamping!
Carol

28 Aug 2012

Mark the Date!

I'm so pleased to be taking part in the upcoming 
SUDSOL BLOG TOUR!

Whether or not you're a Stampin' Up! Demonstrator, 
you'll enjoy visiting the 25 blogs and 
discovering plenty of ideas using the products from the 
Holiday Mini Catalogue.

Be sure to mark September 6th on your calendar,
 and make time to see all the super ideas!

Happy Stamping!
Carol

16 Aug 2012

A Spooktacular Offer from Stampin' Up!


When you join Stampin' Up! for $125 you will receive $155 worth of your choice of products, PLUS you will also receive this fun Hallowe'en Kit (valued at $75) for FREE.

But only until August 31st, so ... think about it!

Being a Stampin' Up! demonstrator is a fun way to meet people, set your own working hours, follow your passion for stamping, get a discount on your supplies, win awards, allow your creativity and/or business acumen to soar!

There are so many ways of filling your demo commitment. You must sell $400 worth of product every three months (not necessarily all at one time though) to remain active. However there is no penalty if you fail to do so (except you will lose your demo perks).

If you just want the 20% discount and remain a 'Hobby Demo', simply fulfill the requirement yourself, or with a group of friends. You will still receive the monthly magazine, access to the demo website for ideas and inspiration, and be able to connect with a group of fun demos.

If you are more business oriented you can build your Stampin' Up! business YOUR way - there are no strict obligations, just ideas and suggestions such has:
  • Offer Workshops where crafters can make a sample card and order product.
  • Hold classes to make cards, scrapbook pages, 3-D items, etc. and charge a set fee.
  • Make finished projects and sell them at craft fairs or local stores.
  • Establish regular clubs where crafters meet monthly to create and earn hostess benefits.
  • Sell tutorials, kits, finished product on-line. 
 The ideas are limited only by your imagination!

If you have questions, I would love to answer them, and if you live in Canada I would love to have you join our group. Just contact me via email.

And here is what comes in the Spooktacular Offer:


  • Toxic Treats Set (page 25 in the Holiday Mini catalogue)
  • Printers tray shown in photo
  • Ribbon & Bakers Twine
  • Buttons & Rhinestones
  • Papers & Dimensionals
  • Cobweb
Everything but the Ink!

Make your decision, then contact me before August 31st.

Happy Stamping
Carol

14 Aug 2012

In Pursuit of my Tennis Passion

So I've been away for a bit and it was exciting. First of all I got to visit my middle daughter who has just moved with her husband to Toronto! It was a double pleasure because I had purchased tickets for the Rogers Cup (Canada's Tennis Tournament) even before we knew they were moving.

I spent four exciting, hot days at the Rexall Centre watching people like Milos Raonic, Andy Murray, Djokovich, Del Potro, and Tsonga, exercising their skills. This was the first afternoon so there wasn't a huge crowd...

But I had a great seat... beside the camera man!
And in case you don't see how this has anything to do with stamping, well... Lindt is one of the sponsors and gave a free box of chocolates to everyone who brought in their ticket stub... and I was there for 8 sessions...


And we all know stampers LOVE chocolate...

Unfortunately there aren't any Lindt Chocolate Boutiques in Nova Scotia where I live so I gave the ticket stubs to my daughter in Toronto and she picked them up after we left. :0) (Or I would have eaten them all myself!)

I'll be back tomorrow with a paper stamping sample to share!

Happy Stamping
Carol


2 Aug 2012

Creativity Goes Digital!


My Digital Studio 2 software allows you to quickly add photos, 1000's of Stampin' Up! images, colours, ribbon, text and much more to your scrapbook pages, greeting cards, calendars and much more. Beauty in minutes! Expect professional looking results that you can embellish with Stampin' Up! matching accessories for more dimension. It's both Mac and Windows compatible. Stay on top of digital software trends and new releases by visiting here.

What is My Digital Studio 2 Plus (MDS2+)? Full software with design tools to create cards, photobooks, calendars, journals, and more. (Including $650 worth of ready-to-go digital content. Click here to see content)

If that excites you, you can download MDS2+ and start creating today for $99.95

---

What is MDS2? Stampin' Up!'s MDS2 digital design software includes:   Full software with design tools to create cards, photobooks, calendars, and more.  Also includes some functional content including a few punches, card stock, and photo layouts. Click here to see limited content. This is a great option if you prefer to order your content individually.

Download MDS2 and create something beautiful for only $49.95 

---

OR if you already have My Digital Studio you can get all the new features of MDS2, including this digital content with the MDS2 Upgrade, only $24.95. This does NOT include the $650 in content found in MDS2+.

Download MDS2 Upgrade and discover all the new things you can do!

---

Still not sure if it's something you'd like? Try the FREE 30 DAY MDS2 TRIAL OFFER to help you make your decision. Click here to see Free Trial content. 


Stampin' Up! offers high quality publishing options delivered to your door (or you can print your creation at home).   Check out the Stampin' Up! pricing and publishing options.